Модификации:Карты
← Индекс

|
Неполный перевод Эта статья или её часть до сих пор не переведены на русский язык.
Вы можете оказать помощь в переводе путем ее редактирования. |
На этой странице объясняется, как редактировать карты. Это расширенное руководство для моддеров.
Вступление
Базовые компоненты
- Карта это расположение местности (например, воды, скал и земли), объектов местности (например, кустарников), зданий, дорожек и триггеров для определенной области. Когда вы достигаете края области или входите в здание, и экран становится черным во время перехода, вы перемещаетесь между картами.
- Каждая карта состоит из нескольких слоев, расположенных один над другим. Объекты на слое выше будут скрывать объекты на слоях ниже. Так расположены стандартные слои...
Название слоя Типичное содержание Back Рельеф, вода и основные функции (например, постоянные пути). Buildings Заполнители для зданий (например, фермерского дома). Любые плитки, размещенные на этом слое, будут действовать как стена, если свойство плитки не имеет "Проходимой" буквы "Т". Paths Полы, дорожки, трава и мусор (например, камни, сорняки и пни из таблицы "дорожки"), которые игрок может удалить. Front Объекты, которые нарисованы поверх вещей позади них, как и большинство деревьев. Эти объекты будут нарисованы поверх игрока, если игрок находится к северу от них, но позади игрока, если игрок находится к югу от них. AlwaysFront Объекты, которые всегда рисуются поверх других слоев, а также игрока. Это обычно используется для эффектов переднего плана, таких как лиственный покров. - (С Использованием Плитки) Существует 2 различных типа слоев, а также 5 основных слоев, Слой объектов (значок в виде облака) и слой плитки (значок сетки). Слой плитки-это место, где вы вносите изменения в карту (размещаете и удаляете плитки), а слои объектов-это место, где вы добавляете и редактируете данные плитки. Ваши слои должны соответствовать тем, что указаны выше. Обратите внимание, что в зависимости от карты у них может отсутствовать слой "Paths" или "AlwaysFront".
- Каждый слой состоит из множества тайлов, которые представляют собой квадраты размером 16×16 пикселей, расположенные в сетке для формирования видимой карты. Каждая плитка может иметь свойства (например, проходимая / заблокированная), специальную логику (например, действие, которое нужно выполнить, когда игрок наступит на них), и изображение, которое нужно показать. Изображение представлено индексом спрайта (или индексом плитки), который является его положением в связанной таблице спрайтов (см. Далее).
- Каждая карта имеет одну или несколько таблиц спрайтов (также известных как таблицы листов, когда речь идет о модах), которые содержат доступные плитки и изображения, собранные вместе для формирования видимой карты.

Координаты тайлов
Каждый тайл имеет координаты (x, y), которые представляют его положение на карте, где (0, 0) - верхний левый тайл. x значение увеличивается вправо, и y увеличивается вниз. Например:

Форматы карты
В моддинге Stardew Valley используются два формата карт: .tmx (из редактора тайловых карт) и .tbin (из ныне устаревшего редактора карт tIDE). Функции, поддерживаемые обоими форматами, почти идентичны, но есть несколько отличий:
| Особенность | .tmx | .tbin |
|---|---|---|
| Формат | ✓ XML (в основном текст) | ✘ бинарный |
| Редактировать тайлами | ✓ поддерживается | ✓ поддерживается с плагином |
| Редактировать напрямую | ✓ можно открыть в текстовом редакторе | ✘ не поддерживается |
| Переворачивание тайлов | ✓ поддерживается | ✘ не поддерживается |
| Попорот тайлов | ✓ поддерживается | ✘ не поддерживается |
| Управление версиями | ✓ эффективное хранение, может различать изменения | ✘ неэффективное хранение (необходимо копировать весь файл с каждой записью), не может различать изменения |
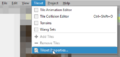
.tmx рекомендуется в соответствии с вышеизложенным, но оба формата удобны в использовании, и вы можете конвертировать их между собой, нажав File > Export As.
Приступая к работе
Существует два основных способа редактирования карты.
Использование SMAPI
Создание мода SMAPI требует программирования, но он намного мощнее, и несколько модов SMAPI могут редактировать одну и ту же карту. Если вы хотите использовать этот подход:
- Создание SMAPI мода.
- Смотри инструкции ниже для внесения изменений в карту.
Обратите внимание, что это также не исключает использования тайлов. Вы можете создавать/редактировать карты в тайлах, затем загружать/редактировать их в SMAPI.
Использование тайлов
Tiled - популярный редактор карт, который можно использовать для редактирования карт Stardew Valley, без необходимости программирования. Вам нужно распаковать XNB карту, отредактировать карту и создать Content Patcher или SMAPI мод и загрузить в него карту. Если вы хотите использовать этот подход:
- Установите последнюю версию Tiled.
- После установки в левом верхнем углу перейдите в Edit > Preferences > Plugins и включите плагин tbin (tbin.dll для Windows, libtbin.so для Linux, или libtbin.dylib для Mac).
- Установите следующие параметры:
Параметр Значение Описание View > Snapping > Snap to Grid ✓ Включен Необходимо для преобразования объектов обратно в формат игры. View > Highlight Current Layer ✓ Включен Делает выделение редактируемого тайла более понятным. - Смотри Модификации:Редактирование XNB файлов для помощи в распаковке и упаковке файлов карт.
- Смотри инструкции ниже для внесения изменений в карту.
(Если вы используете xnbcli для для распаковки оригинальных файлов карт, вам понадобится .tbin плагин, даже если вы планируете использовать .tmx поскольку xnbcli все еще производит .tbin файлы.)
Редактирование карты
Редактирование карт
Важное примечание: при создании пользовательских карт всегда начинайте с ванильной карты и редактируйте ее. Не пытайтесь создать новую карту в Tiled; в игре должны присутствовать определенные плитки, свойства карты и т.д.
Если вы используете Tiled:
- Распакуйте папку Content/Maps и создайте копию для редактирования ваших карт. Используйте эту копию папки для редактирования любых карт, прежде чем перемещать их в папку мода.
- Используйте тот же метод, чтобы распаковать карту, которую вы хотите отредактировать, если она не является ванильной, а затем поместите карту в папку редактирования.
- Откройте .tbin или .tmx файл в Tiled. Примечание: убедитесь, что файл находится в той же папке, что и распакованные таблицы тайлов!
- Внесите свои изменения.
- Сохраните файл. Не используйте Save as, так как это может повредить карту.
- Переместите .tbin или .tmx файл, и любые пользовательские таблицы тайлов, которые ему нужны, в папку вашего мода. Поместите их в папку assets.
- Загрузите свою карту через SMAPI или Content Patcher (или другой фреймворк модов).
Пользовательская карта
Вы можете добавить в игру новую карту и местоположение.
Если вы используете SMAPI:
public override void Entry(IModHelper helper)
{
   // игра очищает локации при загрузке сохранения, поэтому сделайте это после загрузки сохранения
   helper.Events.GameLoop.SaveLoaded += this.OnSaveLoaded;
}

private void OnSaveLoaded(object sender, SaveLoadedEventArgs args)
{
   // получиь внутренний ключ ресурса для файла карты
   string mapAssetKey = this.Helper.Content.GetActualAssetKey("assets/map.tmx", ContentSource.ModFolder);

   // добавить местоположение
   GameLocation location = new GameLocation(mapAssetKey, "YourLocationName") { IsOutdoors = false, IsFarm = false };
   Game1.locations.Add(location);
}
- Примечание:
- Ваша карта должна быть построена по определенному шаблону; посмотрите на карты в папке Content/Maps для примера.
- После загрузки файла сохранения вы можете использовать эту команду для перехода к карте: debug warp YourLocationName X Y
Если вы используете Tiled:
- Вы можете создать карту в Tiled, но вам нужен SMAPI, чтобы добавить ее в игру.
Настраиваемый лист тайлов
Вы можете добавлять на карту пользовательские спрайты, тайлы или изображения. Обязательно используйте префикс z_ перед ID чтобы избежать смещения индексов ванильных таблиц.
Если вы используете SMAPI:
public override void Entry(IModHelper helper)
{
   helper.Events.GameLoop.SaveLoaded += this.OnSaveLoaded;
}

private void OnSaveLoaded(object sender, SaveLoadedEventArgs args)
{
   // Это позволяет получить ключ ресурса для файла tilesheet.png из папки вашего мода. Вы также можете загрузить таблицу игровых листов, например
   // helper.Content.GetActualAssetKey("spring_town", ContentSource.GameContent).
   string tilesheetPath = this.Helper.Content.GetActualAssetKey("tilesheet.png", ContentSource.ModFolder);

   // Получить экземпляр игрового местоположения, которое вы хотите исправить. Для фермы вместо этого используйте Game1.getFarm ().
   GameLocation location = Game1.getLocationFromName("Town");

   // Добавить лист тайлов
   TileSheet tilesheet = new TileSheet(
      id: "z_your-custom-spritesheet", // уникальный ID для таблицы тайлов
      map: location.map,
      imageSource: tilesheetPath,
      sheetSize: new xTile.Dimensions.Size(32, 64), // размер тайла вашего изображения в таблице тайлов.
      tileSize: new xTile.Dimensions.Size(16, 16) // для карт всегда должно быть 16x16
   );
   location.map.AddTileSheet(tilesheet);
   location.map.LoadTileSheets(Game1.mapDisplayDevice);
}
- Чтобы изменить тайлы с помощью новой таблицы тайлов, смотри #Тайлы.
Если вы используете Tiled:
- Создайте свою таблицу спрайтов и поместите ее в ту же папку, что и ваш .tbin или .tmx файл карты. Это должно быть изображение в формате PNG с изображениями, разделенными на плитки 16x16 (Для примера, смотри Модификации:Редактирование_XNB_файлов#Введение).
- Откройте файл карты в Tiled.
- Добавьте свой спрайт-лист:
- В Tilesets панеле, нажмите на
 кнопку.
 - Дайте ему описательное название (например, 'cute bugs') и выберите источник изображения.
- Убедитесь, что Embed in map установлена.
- Сохраните значения по умолчанию для других параметров и нажмите OK.
- В Tilesets панеле, нажмите на
- Добавьте свои спрайты на карту:
- На панели Layers, нажмите на слой, который хотите редактировать.
- На панели Tilesets, нажмите на вкладку с вашим спрайт-листом.
- На панели Tilesets, нажмите на один тайл, чтобы выбрать его. Чтобы выбрать несколько, щелкните и перетащите курсор.
- Наведите курсор на карту, и вы увидите наложение выбранных вами тайлов.
- Нажмите на карту, чтобы разместить тайлы на выбранном слое.
Свойства карты
Каждая карта может иметь несколько свойств карты, которые определяют атрибуты и поведение, связанные с картой, такие как освещение, музыка, точки деформации и т.д. Каждое свойство имеет имя (которое определяет тип свойства), тип (в Stardew Valley, всегда 'строка'), и значение (которое настраивает свойство). Смотри свойства ниже.
Если вы используете SMAPI:
public override void Entry(IModHelper helper)
{
   helper.Events.GameLoop.SaveLoaded += this.OnSaveLoaded;
}

private void OnSaveLoaded(object sender, SaveLoadedEventArgs args)
{
   // получить значение 'Music'
   string currentMusic = Game1.currentLocation.map.Properties.TryGetValue("Music", out PropertyValue rawMusic)
      ? rawMusic.ToString()
      : null;

   // добавить или установить значение 'Music'
   Game1.currentLocation.map.Properties["Music"] = "MarlonsTheme";

   // удалить значение 'Music'
   Game1.currentLocation.map.Properties.Remove("Music");
}
Если вы используете Tiled:
- Нажмите Map на панели инструментов и выберете Map Properties.
- Посмотрите и отредактируйте свойства с помощью графического интерфейса.
Свойства тайла
Свойства тайла задаются отдельно для каждого тайла. Они могут изменять поведение игры (например, может ли игрок пройти по тайлу), или выполнить действие когда игрок наступает/нажимает на него. У каждого свойства есть имя, тип (в Stardew Valley всегда 'строка'), и значение.
Если вы используете SMAPI:
public override void Entry(IModHelper helper)
{
   helper.Events.GameLoop.SaveLoaded += this.OnSaveLoaded;
}

private void OnSaveLoaded(object sender, SaveLoadedEventArgs args)
{
    // например местоположение и координаты плитки
    GameLocation location = Game1.currentLocation;
    int tileX = 10;
    int tileY = 20;

    // получить свойство
    string value = location.doesTileHaveProperty(tileX, tileY, "Diggable", "Back");

    // добавить или установить свойство
    location.setTileProperty(tileX, tileY, "Back", "Diggable", "T");

    // удалить свойство тайла
    Layer layer = location.map.GetLayer("Back");
    Tile tile = layer.PickTile(new xTile.Dimensions.Location(tileX, tileY) * Game1.tileSize, Game1.viewport.Size);
    tile.Properties.Remove("Diggable");
    //tile.TileIndexProperties.Remove("Diggable"); // NOTE: removing a tile index property will affect all tiles of this type
}
Если вы используете Tiled:
- В Tiled свойства тайла представлены двумя типами: object properties применяется только к выбранному тайлу, в то время как tile properties применитесь к каждому экземпляру этого тайла. В общем, вы всегда будете устанавливать object properties, так что мы рассмотрим только их.
- Выберите слой объекта на панели Layers.
- Выберете инструмент
 select object на панели инструментов.
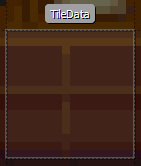
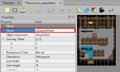
 - Нажмите на объект, свойства которого вы хотите просмотреть. Объекты на карте обведены серой рамкой:
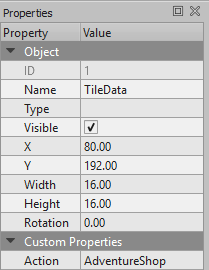
- Свойства объекта будут показаны на панели Properties.


- Для редактирования свойств существующего объекта:
- Измените значение: нажмите на поле и введите новое значение.
- Измените наименование: выберите свойство и нажмите на кнопку и иконкой
 .
. - Добавьте свойство: нажмите на кнопку с иконкой
 , введите наименование свойства, убедитесь в том, что тип свойства "string", и нажмите OK.
- Чтобы добавить новый объект:
- Выберите слой объекта на панели Layers.
Для каждого слоя тайлов должен быть один слой объектов. Если слой объекта отсутствует, создайте слой с тем же именем, что и слой тайлов. - Выберете инструмент
 insert rectangle на панели инструментов.
 - Нажмите и перетащите прямоугольник на тайл, которую вы хотите отредактировать. Убедитесь в том, что он привязан к сетке тайла (смотри #Использование Tiled), и выбран только один тайл.
- Переименуйте TileData в Name
- О том, как редактировать его свойства, смотри в предыдущем разделе.
- Выберите слой объекта на панели Layers.
Тайлы
Вы можете редактировать тайлы для существующей карты.
Если вы используете SMAPI:
public override void Entry(IModHelper helper)
{
   helper.Events.GameLoop.SaveLoaded += this.OnSaveLoaded;
}

private void OnSaveLoaded(object sender, SaveLoadedEventArgs args)
{
    // пример местоположения и координаты тайла
    GameLocation location = Game1.currentLocation;
    int tileX = 10;
    int tileY = 20;

    // удалить тайл со слоя
    location.removeTile(tileX, tileY, "Back");

    // добавить тайл
    Layer layer = location.map.GetLayer("Back");
    TileSheet tilesheet = location.map.GetTileSheet("tilesheet name");
    layer.Tiles[tileX, tileY] = new StaticTile(layer, tilesheet, BlendMode.Alpha, tileIndex: 100); // Изменить индекс тайла

    // переключение поведения водного тайла
    location.waterTiles[tileX, tileY] = false; // true: вода, false: не вода
}
Если вы используете Tiled:
- Смотри документацию по Tiled.
Тайлы анимации

Вы можете анимировать плитки для создания эффектов, таких как Гил в кресле-качалке (смотри пример справа).
Если вы используете SMAPI:
public override void Entry(IModHelper helper)
{
   helper.Events.GameLoop.SaveLoaded += this.OnSaveLoaded;
}

private void OnSaveLoaded(object sender, SaveLoadedEventArgs args)
{
   GameLocation location = Game1.currentLocation;

   // добавить анимированный тайл
   Layer layer = location.map.GetLayer("Buildings");
   TileSheet tilesheet = location.map.GetTilesheet("tilesheet name");
   layer.Tiles[tileX, tileY] = new AnimatedTile(
      layer,
      new StaticTile[] {
         new StaticTile(layer, tilesheet, BlendMode.Alpha, tileID),
         new StaticTile(layer, tilesheet, BlendMode.Alpha, tileID),
         new StaticTile(layer, tilesheet, BlendMode.Alpha, tileID),
         new StaticTile(layer, tilesheet, BlendMode.Alpha, tileID)
      },
      250 // interval in milliseconds
   );
}
Если вы используете Tiled:
- Нажмите кнопку изменить (значок гаечного ключа) для таблицы листов на панели Tilesets.
- Выберите тайл, который вы хотите анимировать в новом представлении.
- Нажмите Tileset > Tile Animation Editor на панели инструментов, чтобы отобразить это окно.
- В новом окне, перетащите плитки из таблицы в поле слева, чтобы создать кадр (одно изображение в последовательности).Если вам нужно удалить кадры, выберете их и нажмите Backspace/Delete(для Windows) или fn + Backspace(для Apple)
- Дважды щелкните, чтобы изменить продолжительность пребывания каждого кадра на экране (в миллисекундах). Убедитесь, что каждый кадр имеет одинаковое время; игра не может обрабатывать разное время кадров. Например, вот редактор анимации, показывающий одну из плиток раскачивания Гила:
- Когда вы закончите, закройте панель.
- Анимированные тайлы на панели Tilesets теперь буут иметь символ в правом нижнем углу:

Анимация теперь является частью этого тайла. Каждый экземпляр этого тайла на карте теперь будет иметь одну и ту же анимацию.


Переворот/поворот тайла

Вы можете поворачивать и переворачивать тайлы без необходимости создавать повернутые/перевернутые версии спрайт-листов. Для этого необходимо установить SMAPI 3.4 или более поздней версии; базовая игра не распознает преобразования тайлов.
Если вы используете SMAPI:
public override void Entry(IModHelper helper)
{
   helper.Events.GameLoop.SaveLoaded += this.OnSaveLoaded;
}

private void OnSaveLoaded(object sender, SaveLoadedEventArgs args)
{
   // получить тайл
   GameLocation location = Game1.currentLocation;
   Layer layer = location.map.GetLayer("Buildings");
   Tile tile = layer.Tiles[tileX, tileY];

   // повернуть на 45°
   tile.Properties["@Rotation"] = 45;

   // перевернуть (0 = нормально, 1 = горизонтально, 2 = вертикально)
   tile.Properties["@Flip"] = 1;
}
Если вы используете Tiled:
- Примечание: это работает только при редактировании .tmx файла. Преобразования тайлов не поддерживаются .tbin плагином.
- Выбрав инструмент штамп, нажмите на тайл в спрайт-листе, который вы хотите использовать.
- Нажмите кнопки перевернуть или повернуть (смотри изображение справа).
- Нажмите на карту, чтобы разместить перевернутый/повернутый тайл.
Свойства
Map properties
Known map properties:¹
| property | explanation |
|---|---|
AmbientLight <byte r> <byte g> <byte b>(valid in indoor locations and locations that ignore outdoor lighting) |
Sets the RGB colour that is subtracted from white (255,255,255) in order to create the ambient light. Example: AmbientLight 95 95 95 for a normal indoor daytime lighting. |
BackwoodsEntry [<int x> <int y>](valid in farm) |
The position the player is warped to when entering the farm from the Backwoods. |
BrookSounds [<int x> <int y> <int type>](valid in outdoor locations) |
Adds sound sources. The <x> <y> fields are the tile coordinates, and <type> is the ambient sound ID. The <type> of sound can be one of...
|
BusStopEntry [<int x> <int y>](valid in farm) |
The position the player is warped to when entering the farm from the Bus Stop. |
| CanCaskHere T² (valid in any location) |
Allows casks to work in that location. |
DayTiles [<string layerName> <int x> <int y> <int tilesheetIndex>]+(valid in any location) |
Sets tiles to appear between 6AM to 7PM. Anytime before 7pm, this finds the tile at position (<x>, <y>) on the map layer matching <layerName>, changes its tilesheet index to the specified <tilesheetIndex>, and adds a glow to simulate daylight. The glow will only be added if the location is indoors and the <tilesheetIndex> is 256, 288, 405, 469, or 1224. The parameters can be repeated to affect multiple tiles.Example: DayTiles Front 3 1 256 Front 3 2 288. |
Doors [<int x> <int y> <string sheetID> <int tileID>]+(valid in indoor locations) |
Adds functionality to interior doors. Used with Action Door tile properties. The <x> <y> fields are the tile coordinates, <sheetID> is the name of the sheet containing the door sprite, and <tileID> is the tile index in the spritesheet.
|
| Fall_Objects T² Spring_Objects T² Summer_Objects T² Winter_Objects T² |
Whether to spawn seasonal objects on spawnable tiles based on the data in Data\Locations.xnb. Example: Fall_Objects. |
FarmCaveEntry [<int x> <int y>](valid in farm) |
The position the player is warped to when entering the farm from the farm cave. |
FarmHouseEntry[<int x> <int y>](valid in farm) |
Changes the position of the Farm House. Corresponds to the front door, or the position the player will be warped to when leaving the house. |
Feed <int x> <int y>(valid in coops and barns) |
Sets the spawn location of the Hay Hopper in a coop or barn. Example: Feed 3 2. |
| forceLoadPathLayerLights T² (valid in outdoor non-festival locations) |
Whether to load lights from the Paths layer on maps where they would not normally be. Example: forceLoadPathLayerLights true. |
| ForceSpawnForageables T² (valid in indoor locations) |
Enables forage items spawning in that location. |
ForestEntry [<int x> <int y>](valid in farm) |
The position the player is warped to when entering the farm from the Cindersap Forest. |
GrandpaShrineLocation [<int x> <int y>](valid in farm) |
The position of grandpa's shrine. Corresponds to the upper left corner. |
GreenhouseLocation [<int x> <int y>](valid in farm) |
The default position of the greenhouse. Corresponds to the upper left corner of the greenhouse's foundation. |
| IgnoreLightingTiles T² (valid in indoor locations) |
Whether to ignore lights on the Front and Buildings layers. Example: IgnoreLightingTiles true. |
| indoorWater T² (valid in indoor locations) |
Enables water logic (ie. fishing, etc.) in that location. |
KitchenStandingLocation [<int x> <int y>](valid in farmhouse) |
The position the player's spouse will stand when using the kitchen. |
Light [<int x> <int y> <int type>]+(valid in any location) |
Adds light sources. The <type> field is the kind of light source (e.g. 4 for twin candles), and <x> <y> are the tile coordinates.The <type> of light source can be one of...
Any other value will crash the game. |
| LocationContext Default (valid in any location) |
Sets the map to be part of the mainland for game logic purposes, like weather. |
| LocationContext Island (valid in any location) |
Sets the map to be part of Ginger Island for game logic purposes, like weather. |
MailboxLocation [<int x> <int y>](valid in farm) |
The position of the player's mailbox. Corresponds to the upper left corner. |
Music <string name>(valid in any location) |
Sets the music that plays when the player enters, where <name> is the cue name in the audio files.Example: Music MarlonsTheme. |
Music <int start> <int end> <string name>(valid in any location) |
Sets the music that plays when the player enters, where <name> is the cue name in the audio files, music will only play if the time is between <int start> (inclusive) and <int end> (exclusive).Example: Music 800 1200 MarlonsTheme. |
NightTiles [<string layerName> <int x> <int y> <int tilesheetIndex>]+(valid in any location) |
Changes the tile after 7pm. Outside, it works along DayTiles: set a DayTiles tile for the map to load between 6am to 7pm, then a NightTiles to load between 7pm to the end of the day. It is mostly used for lamps in the game. |
NPCWarp [<int fromX> <int fromY> <string toArea> <int toX> <int toY>]+(valid in any location) |
Equivalent to Warp, but only usable by npcs. |
| Outdoors T² (valid in any location) |
Sets whether the location is outdoors. Example: Outdoors true. |
ProduceArea <int x> <int y> <int width> <int height>(valid in coops and barns) |
Sets the area where animals can spawn within a coop or barn. Example: ProduceArea 6 4 8 7. |
ScreenshotRegion <int left> <int top> <int right> <int bottom>(valid in any location) |
Constrains the portion of the map rendered when screenshots are taken. Example: ScreenshotRegion 0 27 69 61. |
SeasonOverride [<string season>](valid in any location) |
Assumes a specific season for most game checks. (If a crop is in season, which tilesheet to use, etc.) |
ShippingBinLocation [<int x> <int y>](valid in farm) |
The position of the default shipping bin. Corresponds to the upper left corner. |
| skipWeedGrowth T² (valid in any location) |
Prevents weeds from spawning and spreading in this location. |
SpouseAreaLocation [<int x> <int y>](valid in farm) |
The position of the the outdoor spouse area. Corresponds to the upper left corner. |
Stumps [<int x> <int y> <unused>]+(valid in Secret Woods) |
Adds stumps to the Secret Woods map daily. The third field for each stump appears to be unused. Example: Stumps 24 6 3 29 7 3 26 10 3 46 6 3 34 26 3 41 26 3. |
| TreatAsOutdoors T² (valid in indoor locations) |
The location is treated as outdoors for the purposes of spawning anything other than lights from the Paths layer and yielding Coal from breaking rocks. Example: TreatAsOutdoors true. |
Trees [<int x> <int y> <int type>]+(valid in any location) |
Adds trees to the map. The <x> <y> fields are the tile coordinates, and <type> is the tree type (1: oak, 2: maple, 3: pine, 6: palm, 7: mushroom tree).Example: Trees 17 18 2 20 31 2. |
UniquePortrait [<str name>]+(valid in any location) |
Switches the portraits for the named NPCs to the unique variants for the location. An NPC Jane in location Room will switch to portrait Portraits/Jane_Room. Example: UniquePortrait Maru. |
UniqueSprite [<str name>]+(valid in any location) |
Switches the spritesheets for the named NPCs to the unique variants for the location. An NPC Jane in location Room will switch to spritesheet Characters/Jane_Room. Example: UniqueSprite Maru. |
| ViewportFollowPlayer T² (valid in any location) |
Forces the viewport to stay centered on the player. Example: ViewportFollowPlayer. |
Warp [<int fromX> <int fromY> <string toArea> <int toX> <int toY>]+(valid in any location) |
Sets the tiles which warp the player to another map (e.g. doors). The <fromX> <fromY> fields are the tile coordinates that initiate the warp, and <toArea> <toX> <toY> are the name of the in-game location to warp to and the tile coordinates within it.Example: 6 20 Mountain 76 9. |
WarpTotemEntry[<int x> <int y>](valid in farm) |
The position the player is warped to when teleporting to the farm via Warp Totem or Return Scepter. |
WindowLight [<int x> <int y> <int type>]+(valid in any location) |
Adds light sources that are only lit during the day when it is not raining (like the light coming through a window). See Light for details. |
The following properties are used but apparently have no effect: Arch, Debris, Spouse, and Fish.
¹ Map properties are primary handled in various methods of the GameLocation class, particularly resetLocalState.
² The T value (short for true) is conventional, but any non-empty value will work too.
Tile properties
Known tile properties (excluding specialised properties like TouchAction WomensLocker):¹
| layer | property | explanation |
|---|---|---|
| Back | Bed T² | If the player stands on this tile, they're considered in bed for the purposes of stamina regen (in multiplayer) and pass-out logic. |
| Back | Buildable T² | Allows farm buildings to be placed on this tile if there are no other obstructions. |
| Back | Diggable T² | Marks the tile as diggable with the hoe and enables planting crops. Also allows grass to spread to this tile. |
| Back | NoFishing T² | Prevents the player from casting the line onto this tile when fishing. |
| Back | NoFurniture T² | Prevents the player from placing furniture on this tile. |
| Back | NoSpawn All NoSpawn True |
Combines NoSpawn Grass and NoSpawn Tree. |
| Back | NoSpawn Grass | Prevents debris (e.g. weeds or stones) from spawning on this tile. |
| Back | NoSpawn Tree | Prevents trees from spawning on this tile. Prevents the player from planting trees on this tile, except on the farm. If a tree is already on this tile, prevents it from growing. |
| Back | NoSprinklers T² | Prevents sprinklers from being placed on this tile. |
| Back | NPCBarrier T² | Prevents NPCs from crossing this tile. |
| Back | Passable T² | Lets players walk or place objects on this tile, even if they'd normally be blocked by a building tile or different property. Different from Buildings Passable T below. |
| Back | Placeable T² | Prevents players from placing objects on this tile. |
| Back | Type <str type>
|
Sets the tile type for various game logic (e.g. step sounds or planting crops), where <type> is one of Dirt, Stone, Grass, or Wood.
|
| Back | Water T² | Marks the tile as a water tile for various game logic (i.e. items splash into it, can refill watering can from it, can possibly fish in it, can possibly place crab pots in it, will water nearby paddy crops, will block most open-tile checks, will regenerate health in it if indoors, and will draw animated overlay over it if outdoors; if in the Mines, Sewer, or Submarine; or otherwise not in the Desert). |
| Back | WaterSource T² | Lets the player refill the watering can from this tile. |
| Buildings | Passable T² | When placed on a water tile, the game no longer considers it open water (e.g. if it's a bridge). Different from Back Passable T above. |
| Paths | Order <I>
|
To place on index 29 and 30 of the Paths tilsheet. Set the order the cabins will spawn at the creation of a Multiplayer save. |
The TouchAction property makes something happen when the player steps on the tile:
| layer | property | explanation |
|---|---|---|
| Back | TouchAction Bus | Starts the Bus Ride to the Desert mini-cutscene, works in conjunction with Action BusTicket. |
| Back | TouchAction ChangeIntoSwimsuit | Changes the player into their swimsuit and disables running. |
| Back | TouchAction ChangeOutOfSwimsuit | Changes the player into their regular clothes and enables running. |
| Back | TouchAction DesertBus | Lets you ride the bus back to the Bus Stop.. |
| Back | TouchAction Emote <string npc> <int emoteID>
|
Finds the NPC whose name matches the <npc> field, and causes them to show the given <emoteID> above their head (4: empty can, 8: question mark, 12: angry, 16: exclamation, 20: heart, 24: sleep, 28: sad, 32: happy, 36: x, 40: pause, 52: videogame, 56: music note, 60: blush).
|
| Back | TouchAction FacingDirection <string npc> <int direction>
|
Finds the NPC whose name matches the <npc> field, and make them face the given direction (0: up, 1: right, 2: down, 3: left).
|
| Back | TouchAction legendarySword | Gives them the Galaxy Sword when holding a Prismatic Shard. |
| Back | TouchAction MagicWarp <string area> <int x> <int y> [string prerequisite]
|
Warps the player to the <x> <y> tile coordinates in the given <area> with a magic sound and effects. If the [prerequisite] field is specified, only occurs if that flag is set via Game1.player.mailReceived.
|
| Back | TouchAction PoolEntrance | Switches the player between swimming and walking mode. |
| Back | TouchAction Sleep | Ends the day if the player confirms. |
The Action property makes something happen when the player interacts (e.g. clicks) with the tile:
| layer | property | explanation |
|---|---|---|
| Buildings | Action AdventureShop | Shows the Adventurer's Guild shop screen. |
| Buildings | Action Arcade_Prairie | Shows the Journey of the Prairie King arcade game. |
| Buildings | Action Arcade_Minecart | Shows the Junimo Kart arcade game. |
| Buildings | Action BuyBackpack | Shows a menu which lets the player upgrade their backpack if an upgrade is available. |
| Buildings | Action Billboard | Shows the calendar menu. |
| Buildings | Action Blacksmith | Opens Clint's shop menu. |
| Buildings | Action BrokenBeachBridge | Prompts you to use wood to repair the bridge. |
| Buildings | Action BusTicket | Offers to let you go to the Calico Desert if the Bus has been repaired. Works in conjunction with TouchAction Bus. |
| Buildings | Action BuyQiCoins | Shows a dialogue which lets the player buy 100 Casino club coins. |
| Buildings | Action ColaMachine | Offers to let the player buy a Joja cola. |
| Buildings | Action ClubCards Action Blackjack |
Shows the casino blackjack minigame. |
| Buildings | Action ClubComputer Action FarmerFile |
Shows a dialogue with play stats (steps taken, gifts given, dirt hoed, etc). |
| Buildings | Action ClubSeller | Shows a dialogue which lets the player buy a Statue of Endless Fortune for one million gold. |
| Buildings | Action ClubShop | Shows the casino shop menu. |
| Buildings | Action ClubSlots | Shows the casino slots minigame. |
| Buildings | Action Dialogue <text>
|
Shows a generic dialogue box with the given text. See dialogue format. Example: Action Dialogue Hi there @! |
| Buildings | Action DivorceBook | Shows divorce options for the player's current marriage status (as if they clicked the divorce book). |
| Buildings | Action Door <npcName> [npcName]
|
Sets up an interior door that cannot be opened unless the player has two or more hearts of friendship with any of the named NPC(s). Placed on the lower of the two door tiles. See dialogue format. Example: Action Door Abigail |
| Buildings | Action ElliotBook | TODO: Explain what this does. |
| Buildings | Action ElliotPiano | TODO: Explain what this does. |
| Buildings | Action EnterSewer | Warps you to the sewer if you have obtained the key. |
| Buildings | Action EvilShrineLeft | Turns your kids into doves for a prismatic shard. |
| Buildings | Action EvilShrineCenter | Erases your ex-spouses memory of you. |
| Buildings | Action EvilShrineRight | Toggles monster spawning for your farm. |
| Buildings | Action Garbage <ID>
|
Has a chance to give a specific item to the player based on the <ID>. Can only be clicked once per day. TODO: Explain what each <ID> means.
|
| Buildings | Action Gunther | Opens the museum menu where you can donate artifacts or claim rewards. |
| Buildings | Action HMGTF | Gives you "??HMTGF??" when you have a Super Cucumber in your hand. |
| Buildings | Action IceCreamStand | If Summer, shows the Ice Cream Stand shopping screen. Otherwise, the player will be told to come back in the summer. |
| Buildings | Action JojaShop | Shows the Joja shopping screen. |
| Buildings | Action Jukebox | Shows the jukebox menu to choose the ambient music. |
| Buildings | Action kitchen | Shows the cooking menu. |
| Buildings | Action Letter <string text>
|
Shows the letter menu on-screen with the given text, with the syntax used by Data\mail.xnb. Example: Action Letter Hey there!^I had some extra wood lying around... I thought maybe you could use it. Take care! ^ -Robin %item object 388 50 %% |
| Buildings | Action LockedDoorWarp [<int toX> <int toY> <string toArea> <int openTime> <int closeTime>]
|
Creates an activation warp normally used on doors with a time window for when it can be used. Note that you must use 24-hour times, i.e. 2000 for 8pm. Example: 6 29 SeedShop 900 2100 |
| Buildings | Action LuauSoup | Used for the Luau Festival, this is where you insert a food item for the soup. |
| Buildings | Action MagicInk | Adds the Magic Ink to your wallet. |
| Buildings | Action Mailbox | Shows the next letter from the player's mailbox (if any). |
| Buildings | Action Material | Shows a summary of the player's stockpiled wood and stone. |
| Buildings | Action Message <string messageKey>
|
Loads a message with the given key from the Content\Strings\StringsFromMaps.xnb file and displays it in a dialogue box. |
| Buildings | Action MessageOnce <int eventID> <string message>
|
If the player hasn't seen the event with ID <eventID>, marks that event seen and displays the given message text in a dialogue box. This does not parse dialogue format.
|
| Buildings | Action MessageSpeech <string messageKey>
|
Identical to Action Message, but replaces the usual inspection cursor with a speech cursor. |
| Buildings | Action MineSign <string message>
|
Shows a mini-dialogue box with the given raw message text. This does not parse dialogue format. |
| Buildings | Action MinecartTransport | Shows the minecart destination menu (or a message if not unlocked). |
| Buildings | Action MineElevator | Shows the mine elevator menu (to warp to a mine level) if the player has reached mine level 5+, else a mine elevator not working message. |
| Buildings | Action NextMineLevel | Warps the player to the next mine level (or level 1 if they're not in the mine). |
| Buildings | Action Notes <int noteID>
|
If the player has found the specified lost book, displays its museum note text and marks it read. Example: Action Notes 17 |
| Buildings | Action NPCMessage <str name> "<str dialogueKey>"
|
If the named NPC is within 14 tiles of the player, reads dialogue with the given key from the string files and displays a dialogue box. See dialogue format. Example: Action NPCMessage Abigail "Strings\\StringsFromCSFiles:Event.cs.1022" |
| Buildings | Action playSound <str cueName>
|
Play the sound or music with the given name. |
| Buildings | Action QiCoins | Shows a dialogue which lets the player buy 10 Casino club coins if they have none, else shows how many they have. |
| Buildings | Action SandDragon | Used for Part 3 of the Mysterious Mr. Qi Quest. |
| Buildings | Action Shop | On festival maps, opens the festival shop. No effect on non-festival maps. |
| Buildings | Action TownMailbox <ID>
|
TODO: Explain what this does. |
| Buildings | Action Warp <int x> <int y> <str area>
|
Warps the player to the <x> <y> tile coordinate in the <area> game location.Example: Action Warp 76 9 Mountain |
| Buildings | Action WarpCommunityCenter | Warps the player to the inside of the Community Center if they have access (else show an "it's locked" message). |
| Buildings | Action WarpGreenhouse | Warps the player to the inside of their greenhouse if they've unlocked it, else shows a message about the greenhouse ruins. |
| Buildings | Action WizardBook | If unlocked, you buy buildings from the wizard here. |
| Buildings | Action WizardHatch | If you're good enough friends with the wizard you warp to his basement, if not you get told you can't go in. |
| Buildings | Action WizardShrine | Shows the character customisation menu normally available from the Wizard's tower. |
¹ Tile properties are handled throughout the codebase using GameLocation::doesTileHaveProperty. Actions and touch actions are handled by GameLocation::performAction and GameLocation::performTouchAction respectively. Emote IDs are listed as Character constants.
² The T value (short for true) is conventional, but any non-empty value will work too.
Paths layer
The Paths layer has icon tiles from the paths tilesheet which affect game behavior on the map:

| tile index | explanation | restrictions |
|---|---|---|
| 0–7 | No effect? TODO: verify how the pathing logic uses it. | |
| 8 | Add this tile to the Light map property with light type 4 (sconce). | Indoors and festivals only.² |
| 9–12 | Spawn a tree when the location is created. Outside the farm, 50% chance to respawn each day. (See also 31–32.) Available trees: oak (9), maple (10), pine (11), and palm 1 (12). |
Outdoors only. |
| 13–18 | Spawn debris when the location is created, or randomly each day. Outside the farm, respawn in spring. Available debris: seasonal weed (13–15), rock (16–17), twig (18). |
Outdoors only. |
| 19 | Spawn a large log when the farm is created, with the top-left corner on this tile. | Farm only. |
| 20 | Spawn a boulder the farm is created, with the top-left corner on this tile.. | Farm only. |
| 21 | Spawn a hardwood stump when the farm is created (and every day on the forest farm), with the top-left corner on this tile. | Farm only. |
| 22 | Spawn grass when the location is created, or randomly afterwards. | Outdoors only. |
| 23 | Spawn a random oak, maple, or pine tree at growth stage 2–3 when the location is created. | Outdoors only. |
| 24–26 | Spawn a normal bush when the location is created. Medium bushes grow blackberries and salmonberries. Available bushes: large (24), medium (25), small (26). |
Outdoors only. |
| 27 | When the location is created, add this tile to the BrookSounds map property with the babblingBrook sound. | Outdoors only. |
| 28 | Spawn a grub here (33% chance per day, unless the map already has 50 grubs). | Mutant Bug Lair only. |
| 29–30 | Place prebuilt cabins in multiplayer based on the layout (29=nearby or 30=separate) and Order tile property, with the top-left corner on this tile. | Farm only. |
| 31–32 | Spawn a tree when the location is created. Outside the farm, 50% chance to respawn each day. (See also 9–12.) Available trees: palm 2 (31), mahogany (32). |
Outdoors only. |
| 33 | Spawn a golden walnut bush when the location is created. | Outdoors only. |
Notes:
- In the Mutant Bug Lair, debris spawn rate is reduced to 33% chance per day.
- Restriction can be overridden with forceLoadPathLayerLights map property.
Potential issues
Порядок листов тайлов
When you replace a vanilla map, don't change the order or IDs of the original tilesheets. Prefix new tilesheet IDs with z_ to avoid changing the original order.
- Why this causes problems
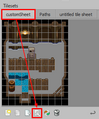
- For example, let's say you replace a map which normally has these tilesheets in Tiled:

- When you add a new tilesheet, note that the order changes from [paths, untitled tile sheet] to [customSheet, paths, untitled tile sheet]:

- If the game tries to access a tile from the first tilesheet, it will get it from customSheet instead of the expected Paths tilesheet. That can cause anything from visual glitches (e.g. showing the wrong tile images) to outright crashes (especially if the new tilesheet is smaller than the one it expected).
- To avoid that, always keep the original tilesheets in the same order and prefix new tilesheets with
z_so they're added at the end:

- How to fix an affected tilesheet
- See "mod reordered the original tilesheets" below.
Local copy of a vanilla tilesheet
When editing a map in Tiled, you may need to copy vanilla tilesheets like path.png or spring_town.png into the map folder for Tiled to find. If the tilesheet is still there when you load the game, SMAPI will use it for your map instead of the game's vanilla tilesheet, which may have unintended effects (e.g. edits from recolor mods won't work in your map).
To avoid issues, you can either...
- Delete vanilla tilesheets from the folder before testing or releasing the mod.
- Rename the tilesheet file to start with a dot (like .spring_town.png) and reference that. When SMAPI loads the map in-game, it'll automatically ignore the dot and look for spring_town.png in the local files or Content/Maps folder.
Map-specific issues
The game makes some assumptions about maps which may break for modded maps. These are the known issues:
| affected maps | issue |
|---|---|
| Maps/Farm Maps/Farm_Combat Maps/Farm_Fishing Maps/Farm_Foraging Maps/Farm_Mining |
|
| Maps/FarmHouse* |
|
| Maps/SpouseRooms |
|
- ↑ The grass sound is set in Grass::loadSprite, which is called from GameLocation::loadObjects if the Paths layer has tile index 22. (The game spawns a grass for each such tile, and later removes them.)
'Save as' in Tiled
When you use 'save as' in Tiled, never save into a different folder. That will change all the tilesheet references to point to the old folder, so it'll no longer work in-game. Instead, copy/move the map files to a different folder if needed.
Locating tilesheets in Tiled
When a map tilesheet is missing, never use the locate option to use a tilesheet from a different folder. That will add a complex tilesheet path which won't work in-game. Instead copy the tilesheets into the same folder as the map, and reference them from there.
Troubleshooting
See also potential issues above for common issues.
"Tilesheet paths must be a relative path without directory climbing (../)"
- What does this mean?
- Your map uses a tilesheet that's outside its folder root. That might happen if you used 'save as' in Tiled to save into a different folder, copied & pasted tiles between maps in different folders, or manually added a tilesheet from a different folder.
- For example:
📁 Stardew Valley/
   📁 Content/
      📁 Maps/
         🗎 townInterior     <──┐
   📁 Mods/                    │
      📁 YourModName/          │ ../../../Content/Maps/townInterior
         📁 assets/            │
            🗎 your-map.tmx  ───┘
- This isn't allowed since it's very fragile (e.g. players might install your mod in a different folder path).
- How do I fix it?
-
- Copy the tilesheets you're using into the same folder as the map.
- For unchanged vanilla tilesheets, rename them to start with a dot (like .townInterior.png). This tells SMAPI to ignore the file when loading the map in-game, and load the one in the Content folder instead.
- In Tiled, click the edit icon under the tilesheet.
- In the tab that opens, click Tileset > Tileset Properties.
- Click the 'Image' field, then the 'Edit' button to locate the tilesheet in the same folder.
For a screenshot guide of steps 3-5, see these images provided by Discord user foggywizard#7430.
- After fixing it, the above example would look like this:
📁 Stardew Valley/
   📁 Mods/
      📁 YourModName/
         📁 assets/
            🗎 your-map.tmx       ───┐
            🗎 .townInterior.png  <──┘ .townInterior.png
"mod reordered the original tilesheets"
- What does this mean?
- See tilesheet order for more info.
- How do I fix it?
- Always keep the original tilesheets in the same order and prefix new tilesheets with
z_so they're added at the end:
- To rename an affected tilesheet in Tiled:
In the tileset pane, click the tab for the tileset and then click the edit icon.
Click Tileset > Tileset Properties from the top menu to show the properties pane.
Change the name in the Name field.


"mod has no tilesheet with ID '<name>'"
- What does this mean?
- You replaced one of the vanilla maps, but your custom map doesn't have all of the original map's tilesheets (or you changed their names in Tiled). This will cause a crash if the game tries to access the missing tilesheet.
- How do I fix it?
- Compare the original and custom maps in Tiled. For each tilesheet in the original map, make sure it's also in the custom map and has the same name (even if you're not using it).
- If you need to rename a tilesheet:
- In the tileset pane, click the tab for the tileset and then click the edit icon.
- Click Tileset > Tileset Properties from the top menu to show the properties pane.
- Change the Name field to match the original map's tilesheet name.
Смотри также
- Discord user foggywizard#7430 annotated some screenshot guides for using Tiled. These include an annotated overview, how to find where the coordinates are, and how to rename a tilesheet.