Модификации:Настройка среды разработки: различия между версиями
Shtompel (обсуждение | вклад) (Новая страница: «←Индекс {{Переведите}} This page is a quick reference for how to use Visual Studio 2017 or MonoDevelop/...») |
Jaggcake (обсуждение | вклад) Метки: правка с мобильного устройства правка из мобильной версии Расширенная мобильная правка |
||
| (не показаны 4 промежуточные версии 2 участников) | |||
| Строка 2: | Строка 2: | ||
{{Переведите}} | {{Переведите}} | ||
| − | + | Эта страница является кратким справочником по использованию Visual Studio 2017 или MonoDevelop/Visual Studio для Mac при создании или редактировании мода SMAPI. См. основное руководство в [[Modding:Modder Guide/Get Started|Modding:Modder Guide]]. | |
| − | == | + | ==Прежде чем начать== |
<ul> | <ul> | ||
<li>You should install [https://visualstudio.microsoft.com/vs/community/ Visual Studio Community] (Windows), [http://www.monodevelop.com/ MonoDevelop] (Linux), or [https://visualstudio.microsoft.com/vs/mac/ Visual Studio for Mac] (Mac).</li> | <li>You should install [https://visualstudio.microsoft.com/vs/community/ Visual Studio Community] (Windows), [http://www.monodevelop.com/ MonoDevelop] (Linux), or [https://visualstudio.microsoft.com/vs/mac/ Visual Studio for Mac] (Mac).</li> | ||
| Строка 10: | Строка 10: | ||
<li>Here are some basic terms to remember: | <li>Here are some basic terms to remember: | ||
| − | {| class="wikitable" | + | {|class="wikitable" |
|- | |- | ||
! term !! definition | ! term !! definition | ||
| Строка 16: | Строка 16: | ||
| IDE || The program used to edit, run, and compile your code (short for ''Integrated Development Environment''). The main IDEs are Visual Studio on Windows, and MonoDevelop/Visual Studio for Mac on Linux/Mac. | | IDE || The program used to edit, run, and compile your code (short for ''Integrated Development Environment''). The main IDEs are Visual Studio on Windows, and MonoDevelop/Visual Studio for Mac on Linux/Mac. | ||
|- | |- | ||
| − | | DLL || The file with a < | + | | DLL || The file with a <samp>.dll</samp> extension which contains your compiled code (short for ''Dynamic Link Library''). This is the file that SMAPI reads when loading your mod. |
|- | |- | ||
| project || A collection of source code + configuration + resources (like images) you edit in the IDE. Each project is compiled into its own DLL. | | project || A collection of source code + configuration + resources (like images) you edit in the IDE. Each project is compiled into its own DLL. | ||
| Строка 105: | Строка 105: | ||
# Search for the package, click on the result, and click ''Add Package'':<br />[[File:Modding - IDE reference - add NuGet package (MonoDevelop 2).png]] | # Search for the package, click on the result, and click ''Add Package'':<br />[[File:Modding - IDE reference - add NuGet package (MonoDevelop 2).png]] | ||
| − | ==Edit project file (< | + | ==Edit project file (<samp>.csproj</samp>)== |
<span id="edit-project"></span> | <span id="edit-project"></span> | ||
| − | Sometimes you may want to edit the project file directly (mainly to configure build steps). The project is a < | + | Sometimes you may want to edit the project file directly (mainly to configure build steps). The project is a <samp>.csproj</samp> file, and can be edited from within the IDE. |
===In Visual Studio 2017=== | ===In Visual Studio 2017=== | ||
| Строка 128: | Строка 128: | ||
# Open the Solution Explorer pane. If it's not visible, click ''View » Solution Explorer'' from the menu:<br />[[File:Modding - IDE reference - show solution pane (Visual Studio).png]] | # Open the Solution Explorer pane. If it's not visible, click ''View » Solution Explorer'' from the menu:<br />[[File:Modding - IDE reference - show solution pane (Visual Studio).png]] | ||
# From the Solution Explorer pane, right-click on the project and choose ''Open Folder in File Explorer'':<br />[[File:Modding - IDE reference - view build output (Visual Studio).png]] | # From the Solution Explorer pane, right-click on the project and choose ''Open Folder in File Explorer'':<br />[[File:Modding - IDE reference - view build output (Visual Studio).png]] | ||
| − | # Navigate to < | + | # Navigate to <samp>bin\Debug</samp> (or <samp>bin\Release</samp> if you switched to release build configuration). |
===In MonoDevelop/Visual Studio for Mac=== | ===In MonoDevelop/Visual Studio for Mac=== | ||
# Open the Solution pad. If it's not visible, click ''View » Pads » Solution'' from the menu:<br />[[File:Modding - IDE reference - show solution pane (MonoDevelop).png]] | # Open the Solution pad. If it's not visible, click ''View » Pads » Solution'' from the menu:<br />[[File:Modding - IDE reference - show solution pane (MonoDevelop).png]] | ||
# From the Solution pad, right-click on the project and choose ''Open Containing Folder'':<br />[[File:Modding - IDE reference - view build output (MonoDevelop).png]] | # From the Solution pad, right-click on the project and choose ''Open Containing Folder'':<br />[[File:Modding - IDE reference - view build output (MonoDevelop).png]] | ||
| − | # Navigate to < | + | # Navigate to <samp>bin/Debug</samp> (or <samp>bin/Release</samp> if you switched to release build configuration). |
==Add a reference to another DLL== | ==Add a reference to another DLL== | ||
| Строка 145: | Строка 145: | ||
# From the 'Reference Manager' window, click ''OK'':<br />[[File:Modding - IDE reference - add reference (Visual Studio 4).png]] | # From the 'Reference Manager' window, click ''OK'':<br />[[File:Modding - IDE reference - add reference (Visual Studio 4).png]] | ||
| + | [[Category:Модификации]] | ||
| + | |||
| + | [[en:Modding:IDE reference]] | ||
[[zh:模组:IDE 参考]] | [[zh:模组:IDE 参考]] | ||
| − | |||
| − | |||
Текущая версия на 12:00, 27 июня 2022

|
Неполный перевод Эта статья или её часть до сих пор не переведены на русский язык.
Вы можете оказать помощь в переводе путем ее редактирования. |
Эта страница является кратким справочником по использованию Visual Studio 2017 или MonoDevelop/Visual Studio для Mac при создании или редактировании мода SMAPI. См. основное руководство в Modding:Modder Guide.
Прежде чем начать
- You should install Visual Studio Community (Windows), MonoDevelop (Linux), or Visual Studio for Mac (Mac).
- Reviewing C# Fundamentals for Absolute Beginners is strongly recommended if you're new to programming C#.
- Here are some basic terms to remember:
term definition IDE The program used to edit, run, and compile your code (short for Integrated Development Environment). The main IDEs are Visual Studio on Windows, and MonoDevelop/Visual Studio for Mac on Linux/Mac. DLL The file with a .dll extension which contains your compiled code (short for Dynamic Link Library). This is the file that SMAPI reads when loading your mod. project A collection of source code + configuration + resources (like images) you edit in the IDE. Each project is compiled into its own DLL. solution A collection of projects with some global settings. The solution itself isn't compiled, but it enables some convenient features (like letting projects easily reference each other).
Create a mod project
Before you can write your mod code, you need to create a solution and project to contain it.
Windows (Visual Studio 2019)
- Open Visual Studio 2019.
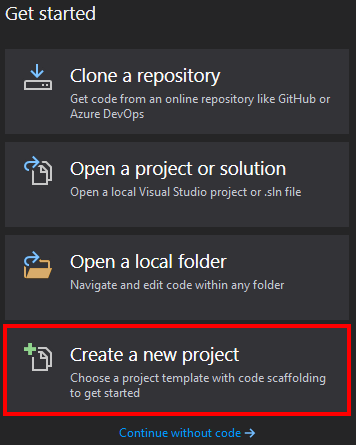
- Click Create a new project from the start screen.
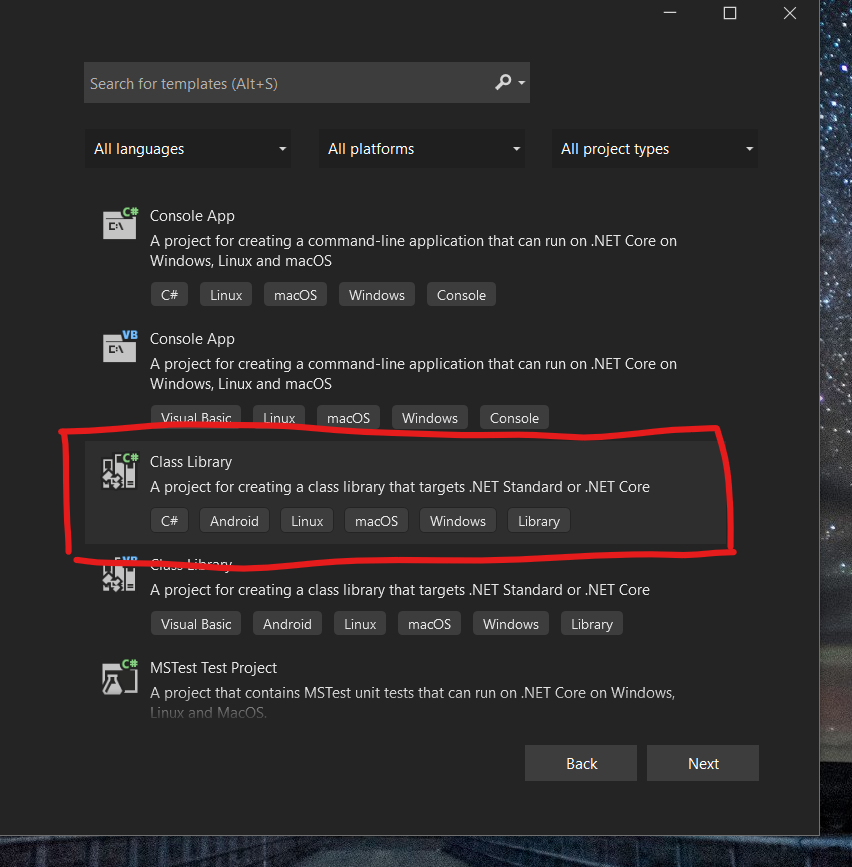
- Filter by "C#" and "Library", then choose Class Library (.NET Framework) and click Next. Make sure you don't choose Class Library (.NET Core) or Class Library (.NET Standard), which won't work.
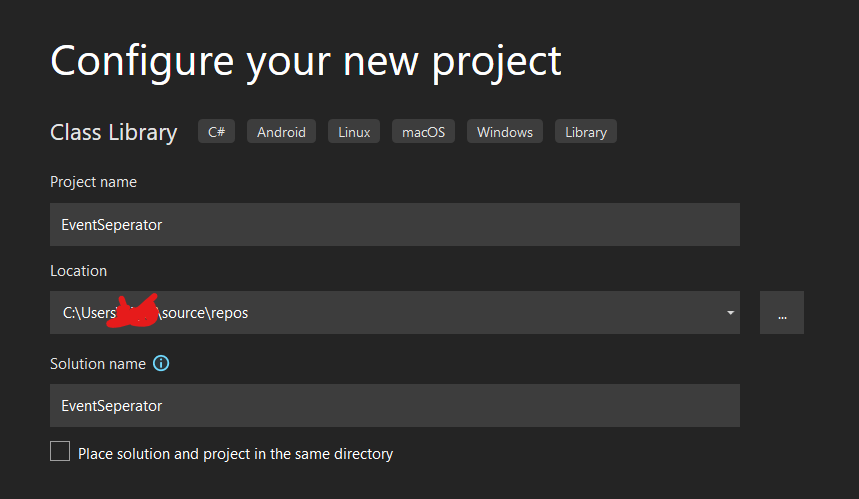
- In the configure your new project window:
- Enter a descriptive mod name. By convention, the name should be one word with mixed caps (like "PineapplesEverywhere").
- Make sure "Place solution and project in the same directory" is not checked.
- Make sure .NET Framework 4.5.2 is selected.
- Click "Create" to to create the project.
.png)
.png)
.png)
Linux (MonoDevelop)
- Open MonoDevelop.
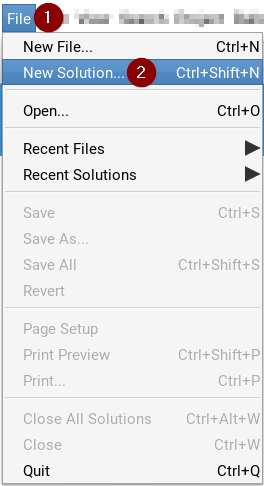
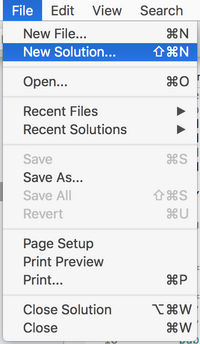
- Click File » New Solution from the menu bar:
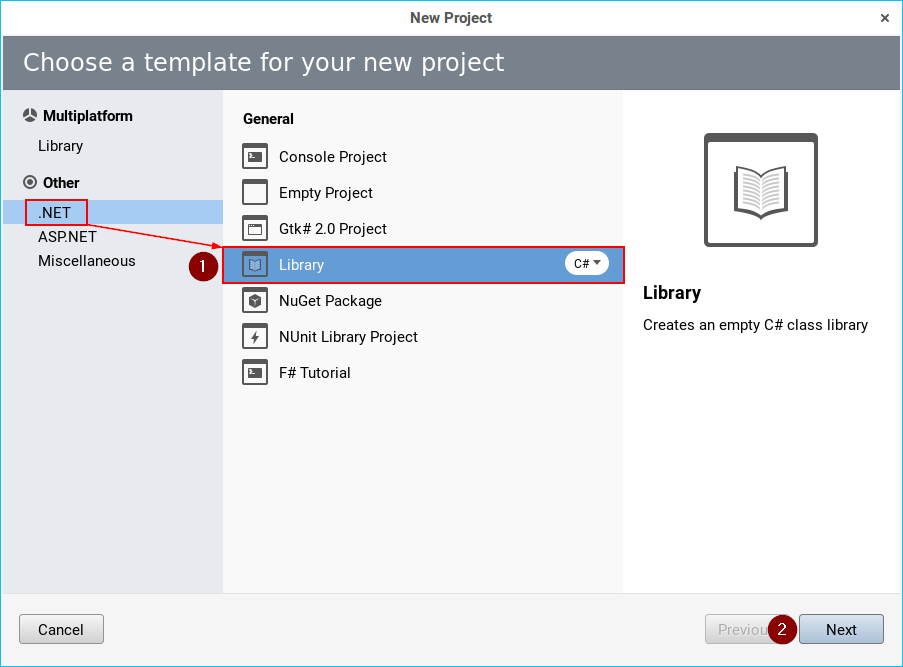
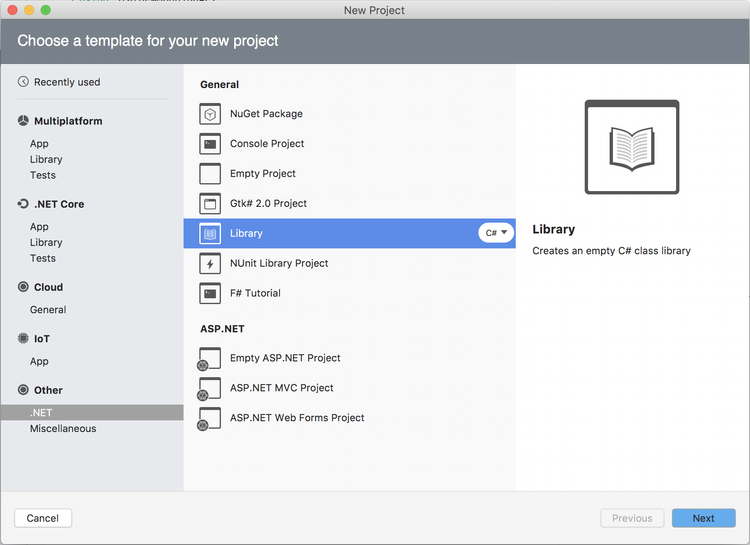
- In the 'New Project' window, choose .NET » Library and click Next:
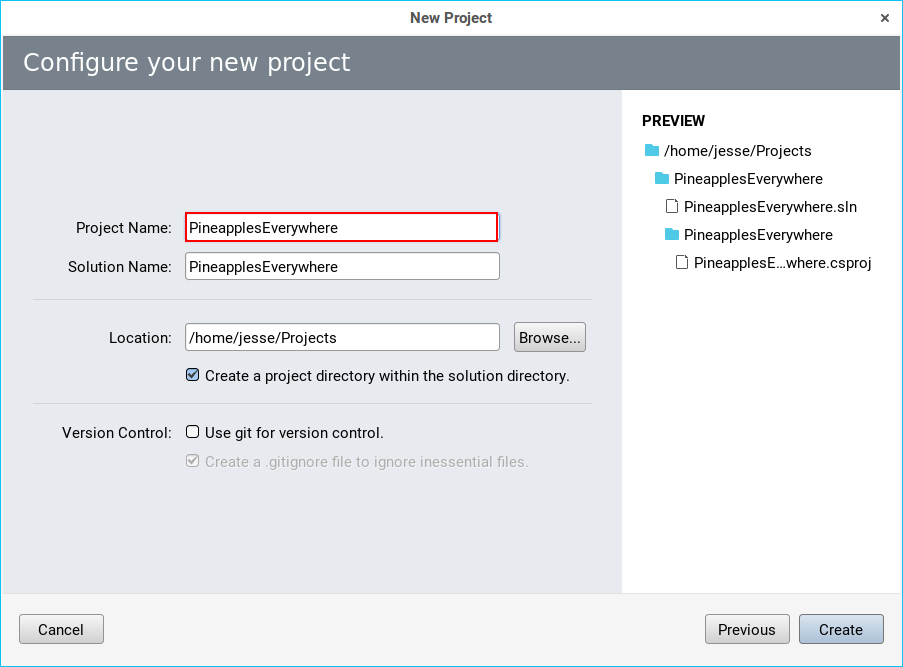
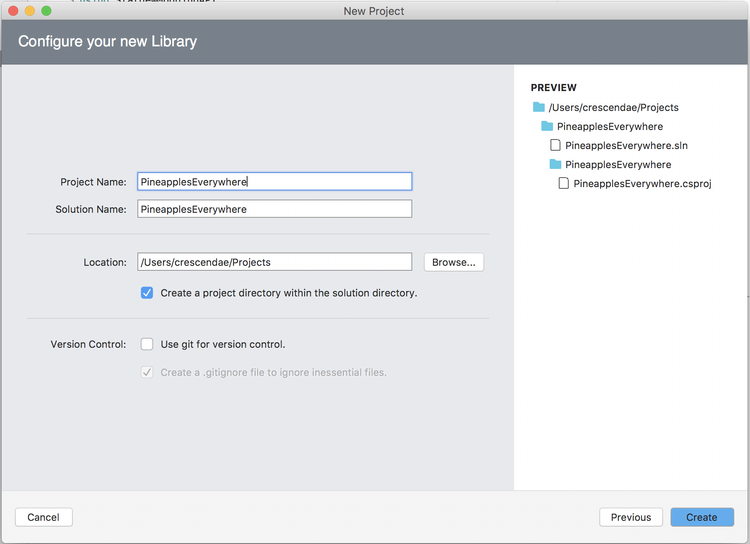
- Enter a descriptive mod name. By convention, the name should be one word with mixed caps (like "PineapplesEverywhere"):
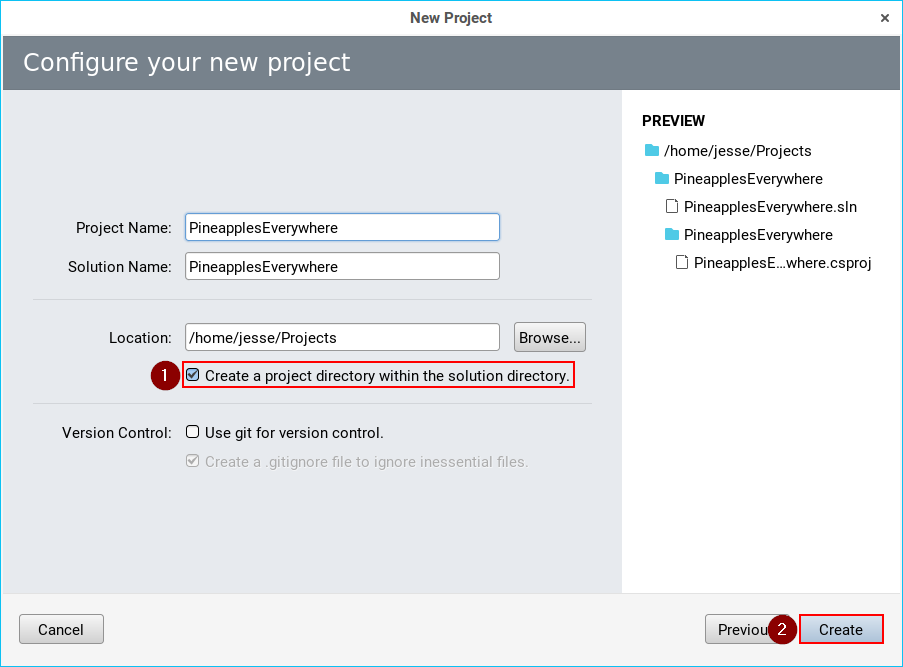
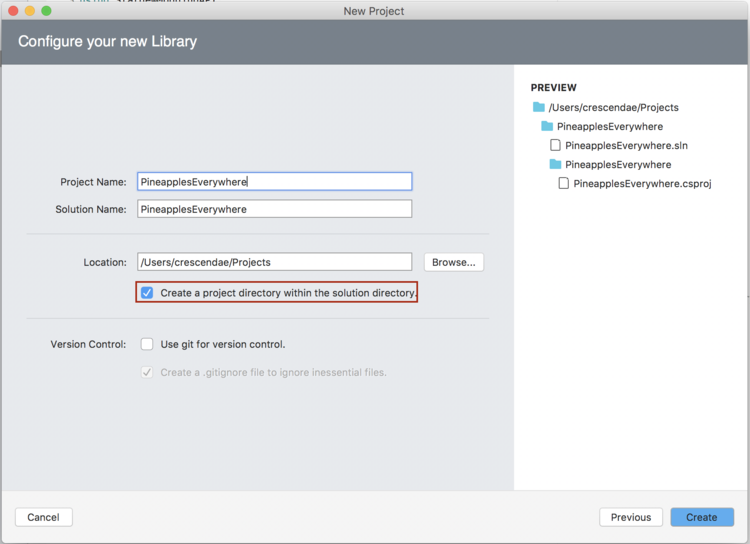
- Make sure "create a project directory within the solution directory" is checked, and click Create:
.png)
.png)
.png)
.png)
MacOS (Visual Studio for Mac)
- Open Visual Studio for Mac.
- Click File » New Solution from the menu bar:
- In the 'New Project' window, choose .NET » Library and click Next:
- Enter a descriptive mod name. By convention, the name should be one word with mixed caps (like "PineapplesEverywhere"):
- Make sure "create a project directory within the solution directory" is checked, and click Create:
.png)
.png)
.png)
.png)
Set the target framework
The 'target framework' is the version of .NET Framework your code uses, which affects the version needed to run your mod. The recommended target framework is .NET Framework 4.5, which is the version SMAPI itself targets.
In Visual Studio 2017
NOTE: Visual Studio 2017 MAY no longer be compatible with creating mods! If you followed Modding:Modder_Guide/Get_Started and receive errors, from the code that page instructed be copy and pasted, with regards to helper.Events in the Entry(IModhelper helper) method and ButtonPressedEventArgs from the Entry(IModHelper helper) method, try the project-creation and code-copy/paste process again with Visual Studio 2019 instead.
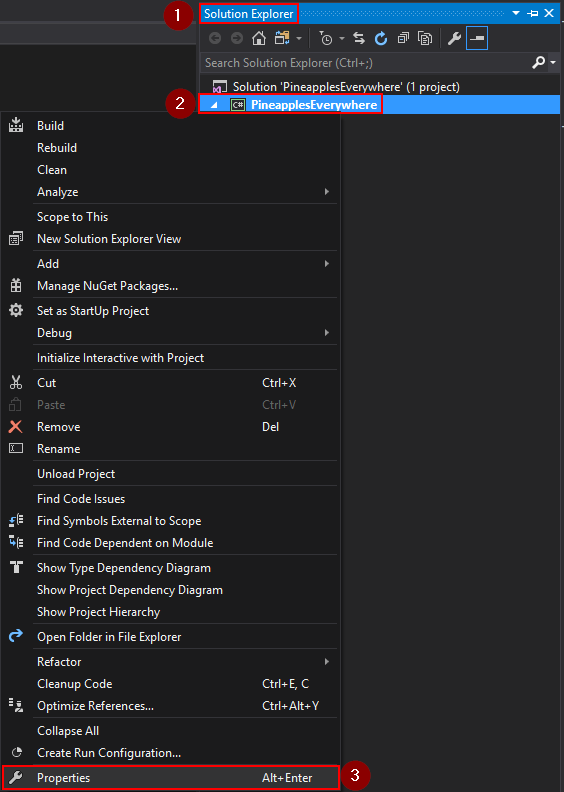
- Open the Solution Explorer pane. If it's not visible, click View » Solution Explorer from the menu:

- From the Solution Explorer, right-click on the project and choose Properties:
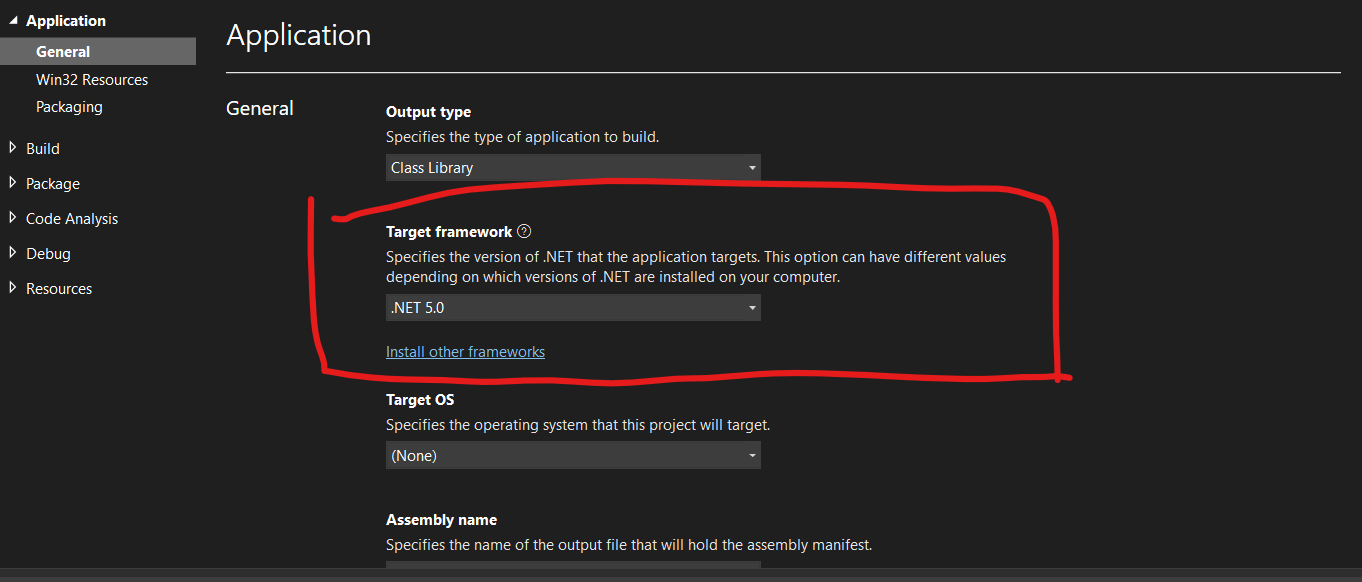
- On the Application tab, change the Target Framework dropdown to .NET Framework 4.5:
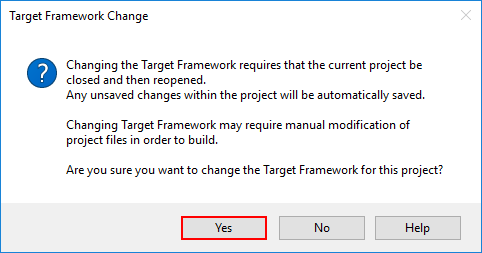
- A dialogue may appear asking you to confirm the change. Click 'Yes' to confirm:
.png)
.png)
.png)
.png)
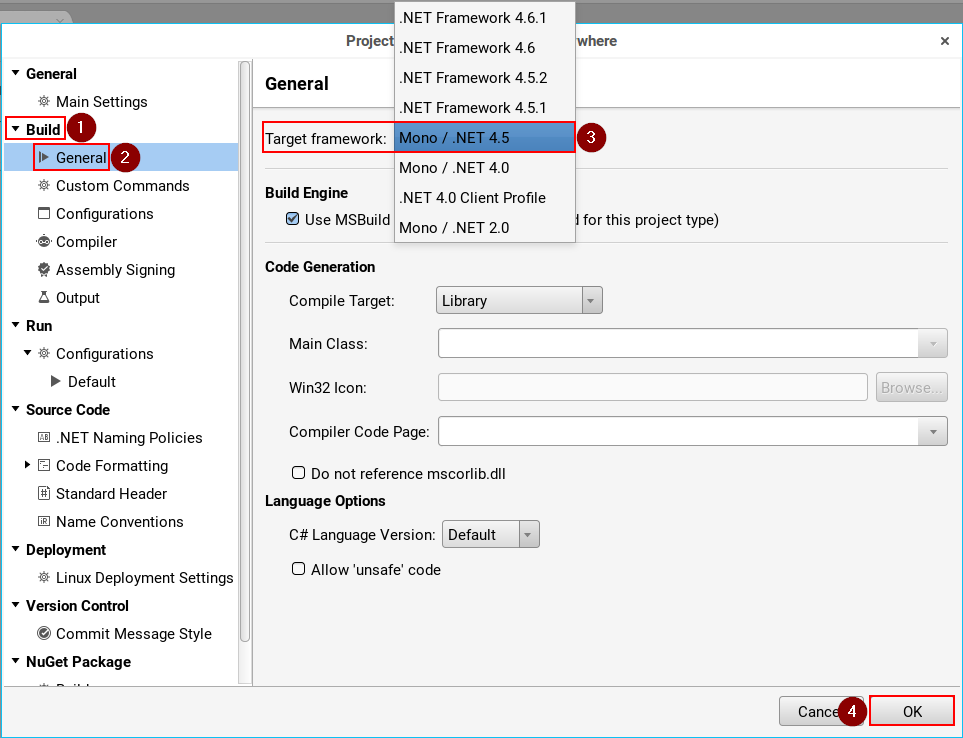
In MonoDevelop/Visual Studio for Mac
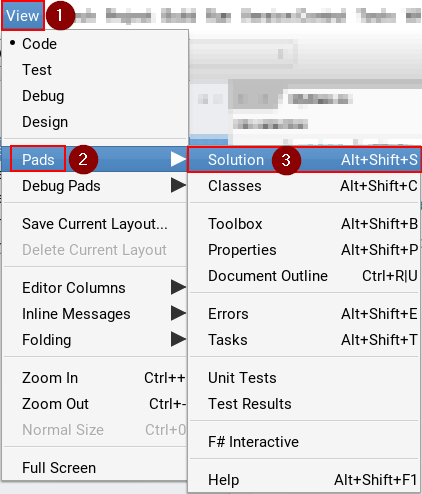
- Open the Solution pad. If it's not visible, click View » Pads » Solution from the menu:
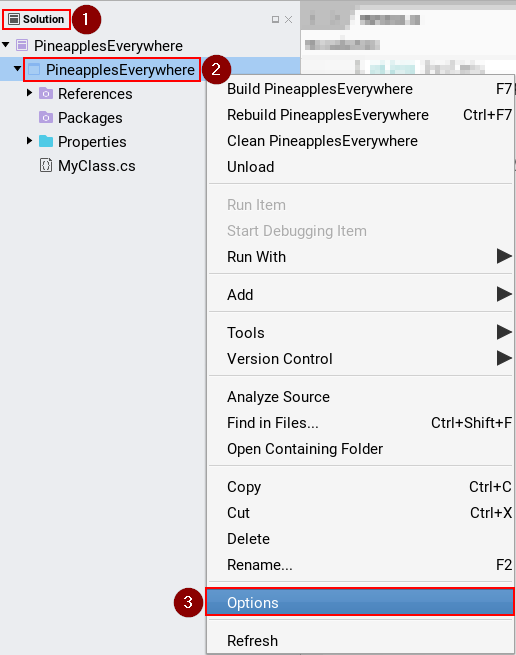
- From the Solution pad, right-click on the project and choose Options:
- On the Build » General tab, change the Target Framework dropdown to Mono / .NET 4.5:
.png)
.png)
.png)
Add a file
In Visual Studio 2017
- Open the Solution Explorer pane. If it's not visible, click View » Solution Explorer from the menu:
- From the Solution Explorer pane, right-click on the project and choose Add » New Item:
- From the 'Add New Item' window, choose the file type (usually Visual C# Item » Class):
- Enter a descriptive file name and click Add:
.png)
.png)
.png)
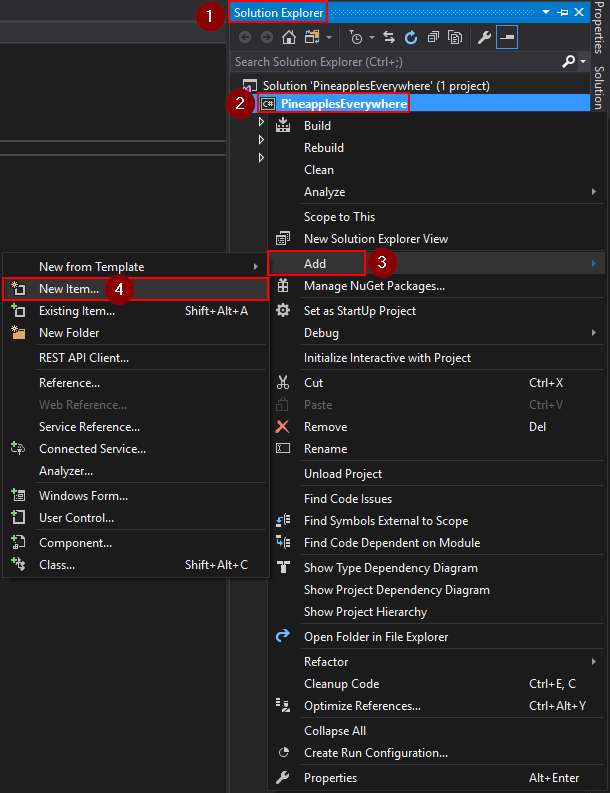
In MonoDevelop/Visual Studio for Mac
- Open the Solution pad. If it's not visible, click View » Pads » Solution from the menu:
- From the Solution pad, right-click on the project to delete and choose Add » New File:
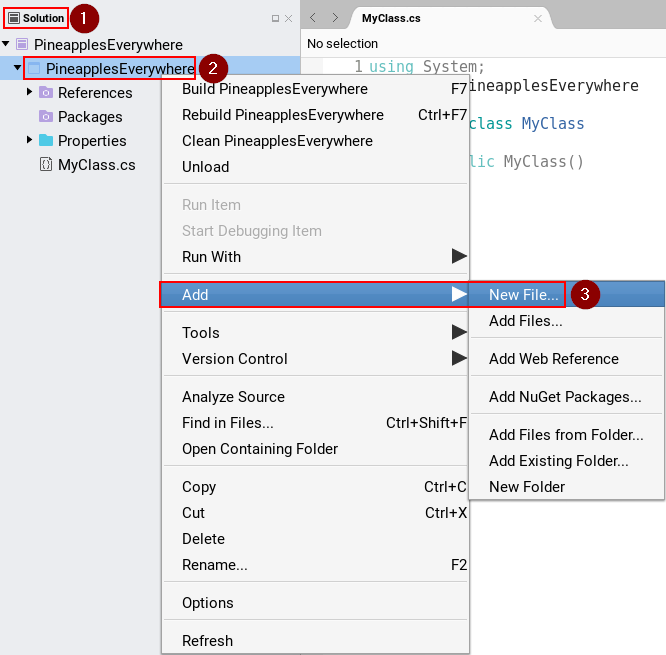
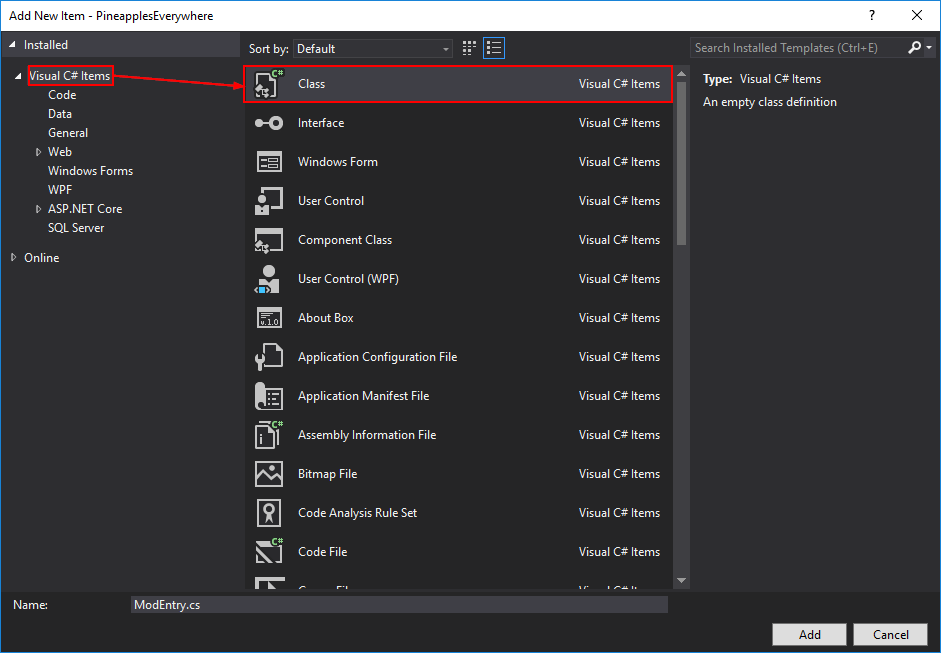
- From the 'New File' window, choose the file type (usually General » Empty Class):
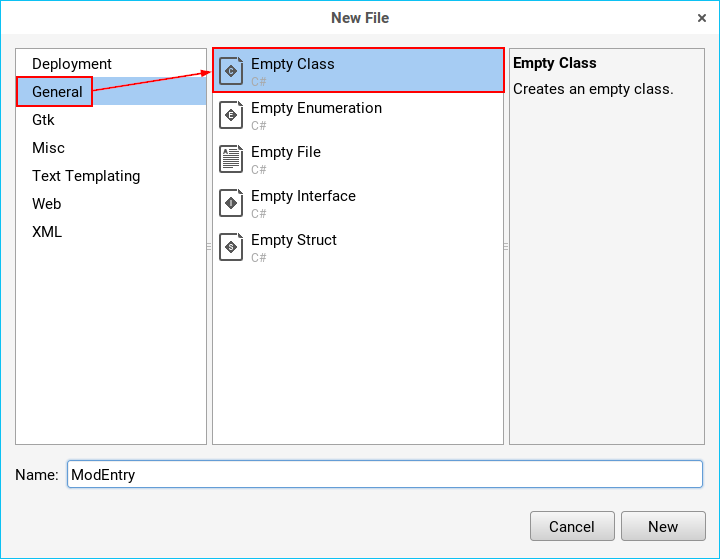
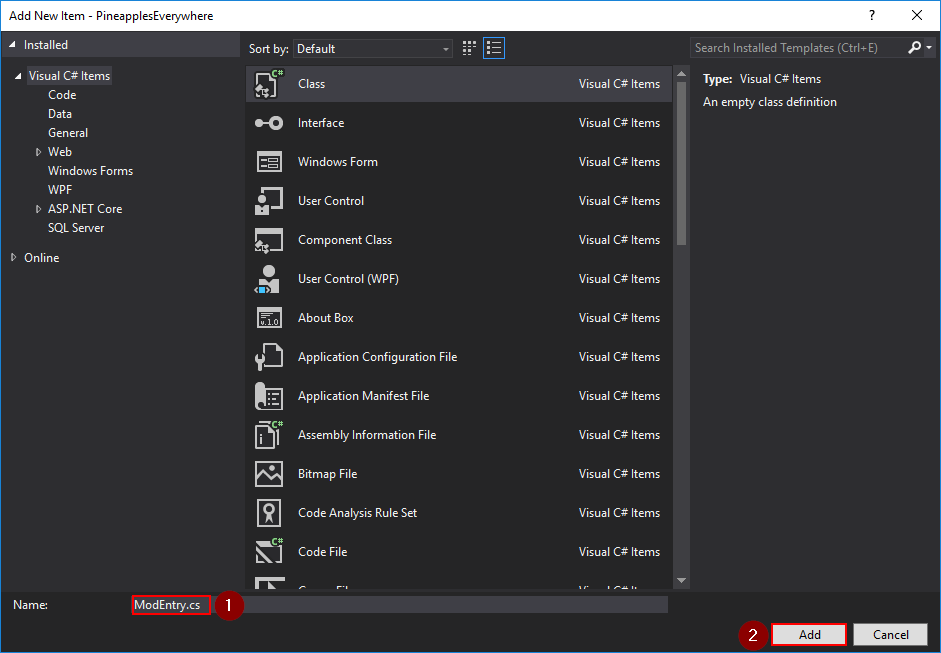
- Enter a descriptive file name and click New:

.png)
.png)
.png)
Delete a file
In Visual Studio 2017
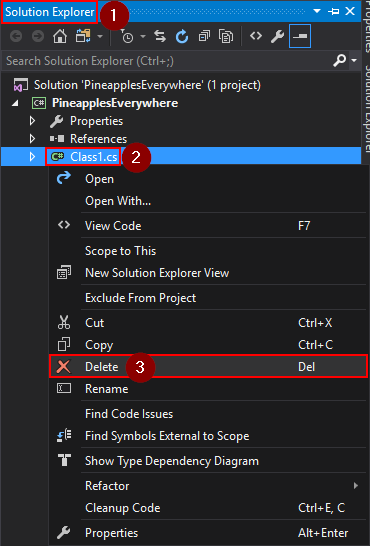
- Open the Solution Explorer pane. If it's not visible, click View » Solution Explorer from the menu:
- From the Solution Explorer pane, right-click on the file to delete and choose Delete:
.png)
In MonoDevelop/Visual Studio for Mac
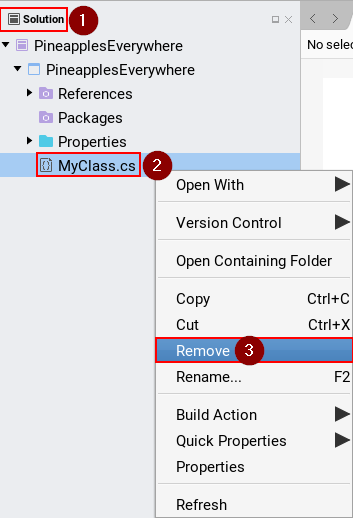
- Open the Solution pad. If it's not visible, click View » Pads » Solution from the menu:
- From the Solution pad, right-click on the file to delete and choose Remove:
.png)
Add a NuGet package
In Visual Studio 2017
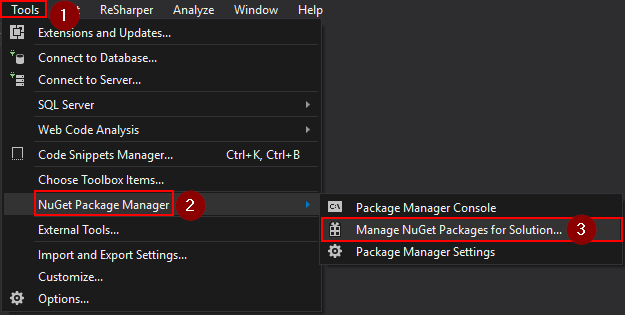
- Click Tools » NuGet Package Manager » Manage NuGet Packages for Solution from the menu:
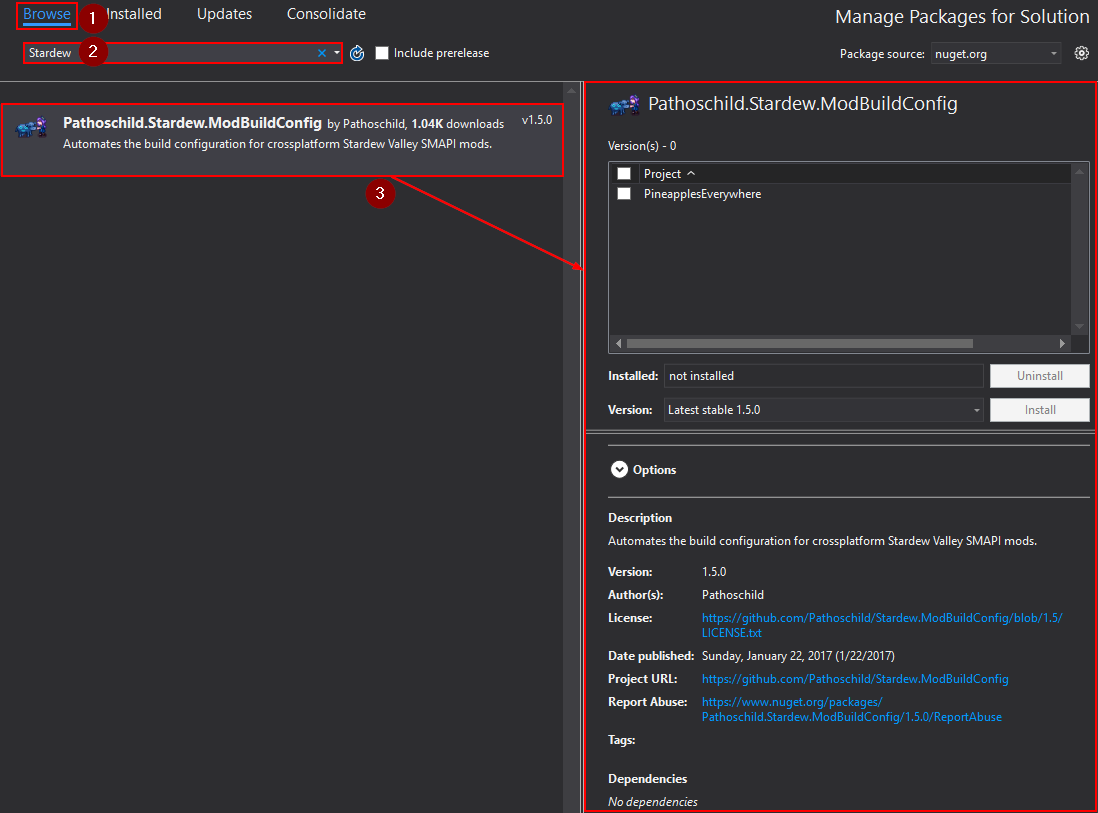
- On the Browse tab, search for the package and click on the result to display some options:
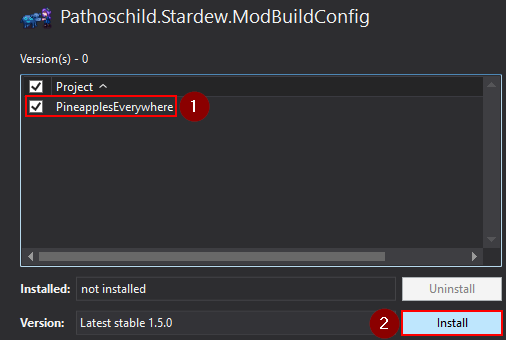
- In the options, check the box next to your project and click Install:
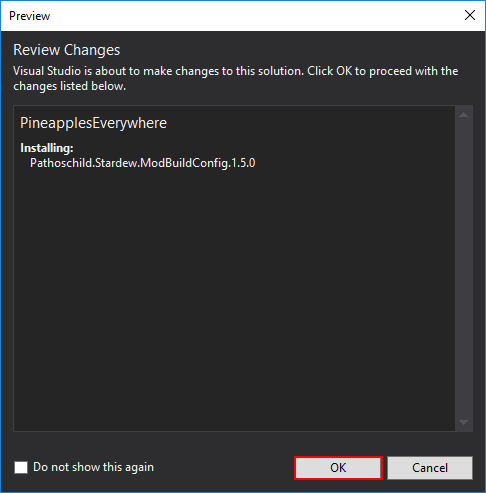
- If a 'Review Changes' dialogue appears, click OK:
.png)
.png)
.png)
.png)
In MonoDevelop/Visual Studio for Mac
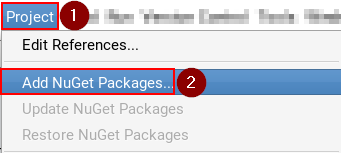
- Click Project » Add NuGet Packages from the menu:
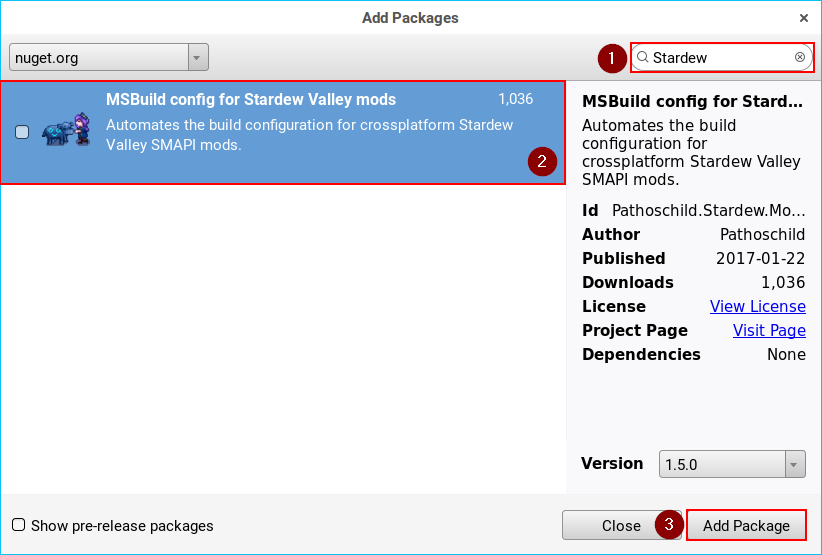
- Search for the package, click on the result, and click Add Package:
.png)
.png)
Edit project file (.csproj)
Sometimes you may want to edit the project file directly (mainly to configure build steps). The project is a .csproj file, and can be edited from within the IDE.
In Visual Studio 2017
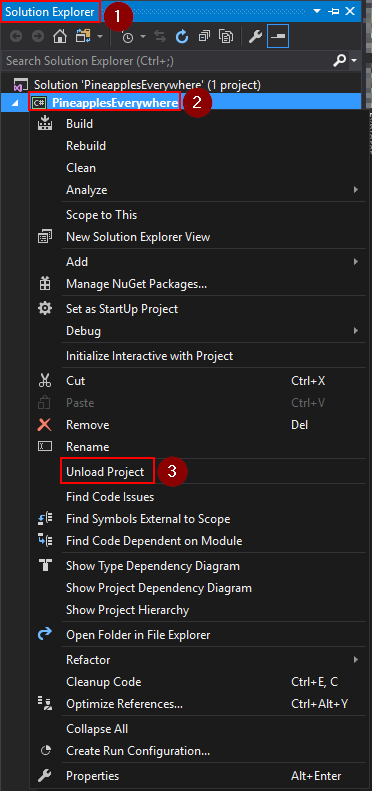
- Open the Solution Explorer pane. If it's not visible, click View » Solution Explorer from the menu:
- From the Solution Explorer pane, right-click on the project and choose Unload:
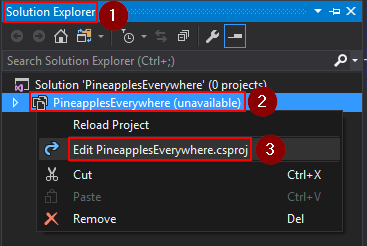
- Right-click on the project again and choose Edit <project name>.csproj:
- Make your changes in the editor that appears and save.
- When you're done, right-click on the project again and choose Reload Project:

.png)
.png)
.png)
In MonoDevelop/Visual Studio for Mac
- Open the Solution pad. If it's not visible, click View » Pads » Solution from the menu:
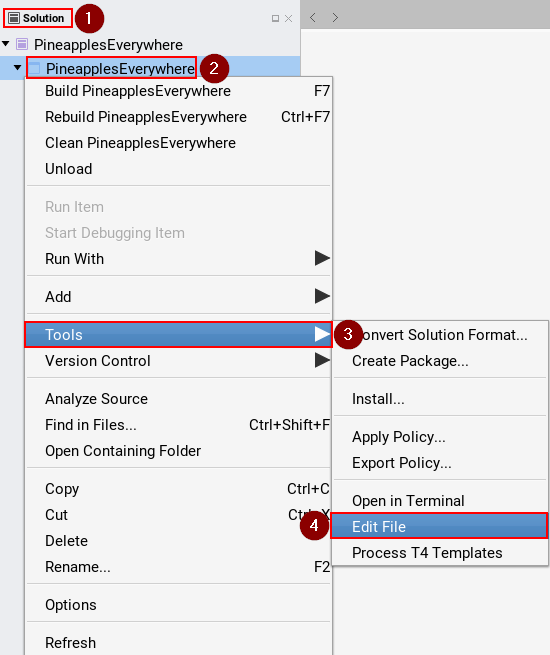
- From the Solution pad, right-click on the project and choose Tools » Edit File:
- Make your changes in the editor that appears and save.
.png)
Find compiled files
In Visual Studio 2017
- Open the Solution Explorer pane. If it's not visible, click View » Solution Explorer from the menu:
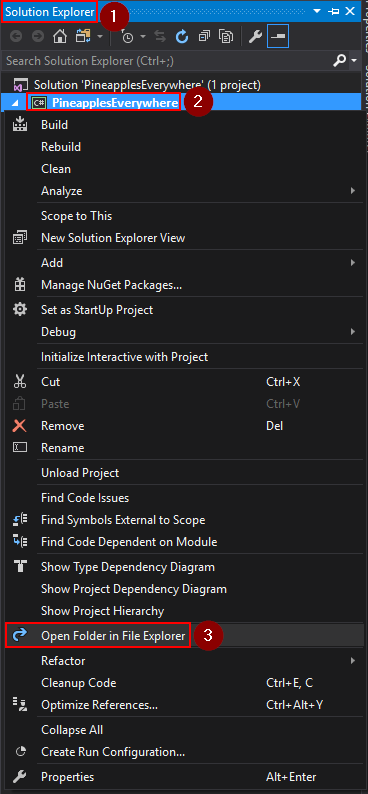
- From the Solution Explorer pane, right-click on the project and choose Open Folder in File Explorer:
- Navigate to bin\Debug (or bin\Release if you switched to release build configuration).
.png)
In MonoDevelop/Visual Studio for Mac
- Open the Solution pad. If it's not visible, click View » Pads » Solution from the menu:
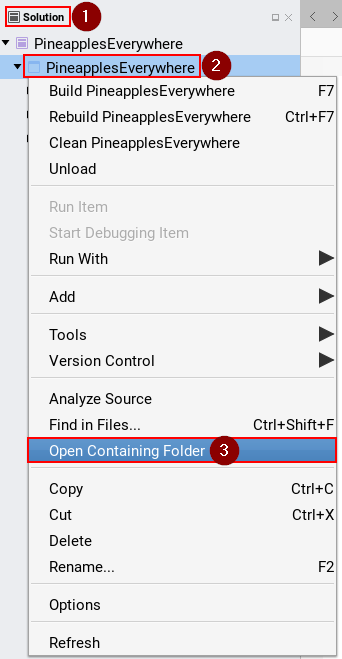
- From the Solution pad, right-click on the project and choose Open Containing Folder:
- Navigate to bin/Debug (or bin/Release if you switched to release build configuration).
.png)
Add a reference to another DLL
In Visual Studio 2017
- Open the Solution Explorer pane. If it's not visible, click View » Solution Explorer from the menu:
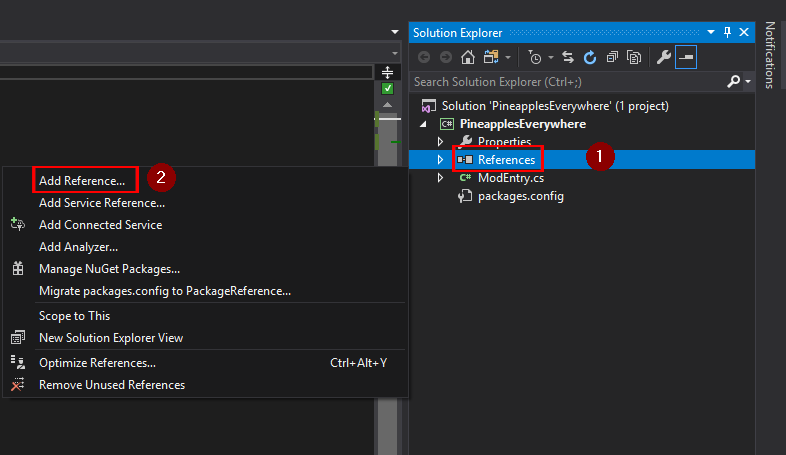
- From the Solution Explorer pane, right-click on References and choose Add Reference...:
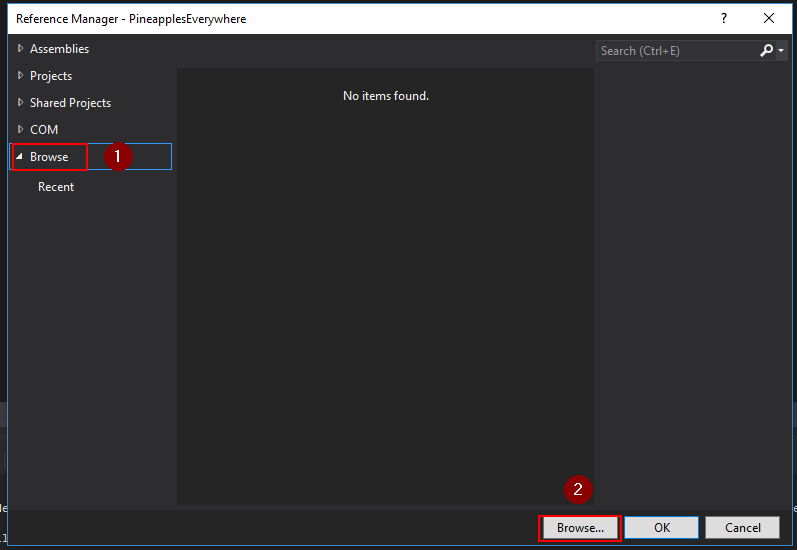
- From the 'Reference Manager' window, choose Browse in the left side, then click Browse.. at the bottom:
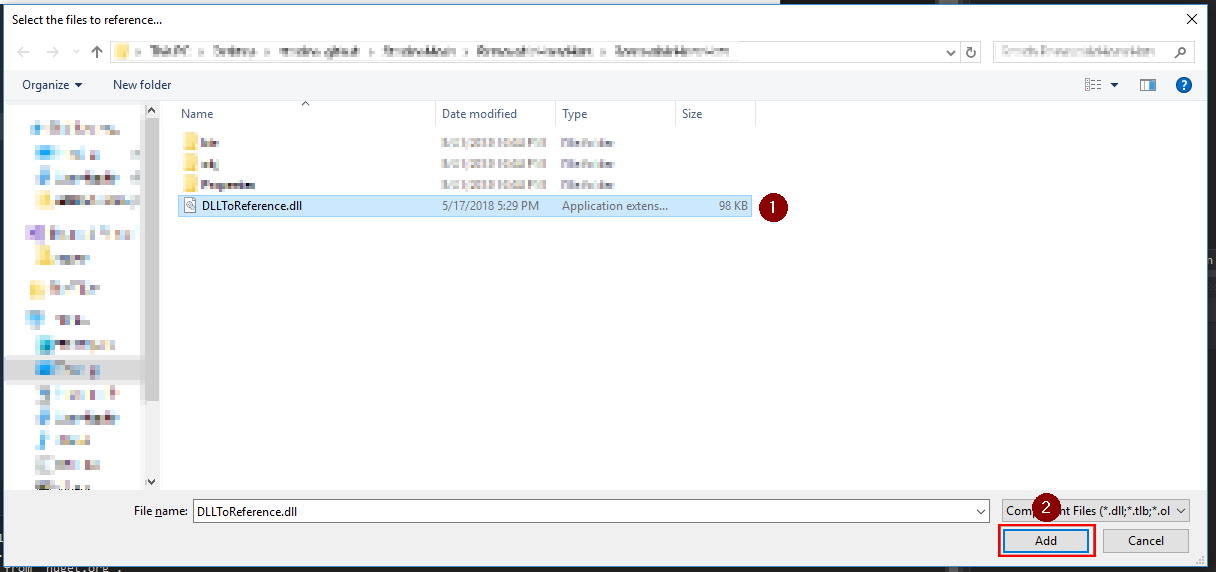
- Find the DLL you want to reference, select it, and click Add:
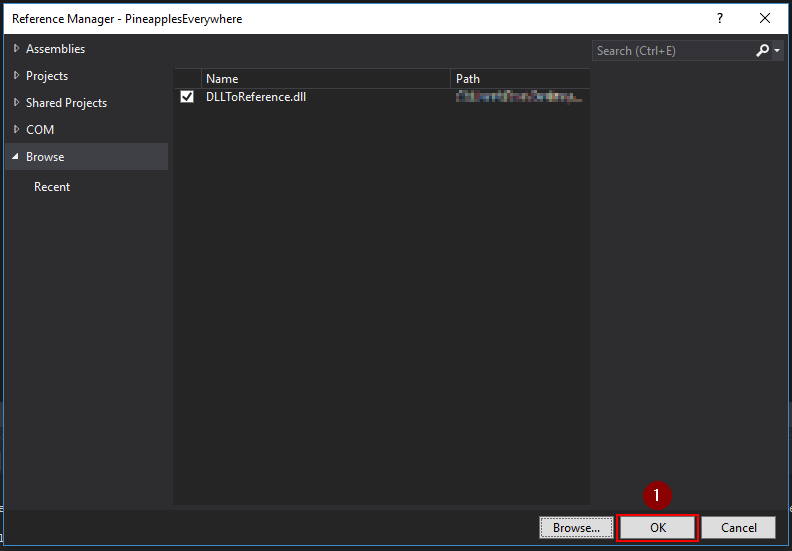
- From the 'Reference Manager' window, click OK:
.png)
.png)
.png)
.png)